
Infrastructure as Code and Network Automation – Where to Start
Learning any new skill takes time, patience, a willingness to try and fail, and ideally continuously learn and grow from our mistakes until we grow more and more proficient. The number one question I get is “How do you get started?”. I got started the hard way – trying to automate a tactical, one-time, unique, complicated, large-scale problem out of necessity with little time to learn the best way to approach such a problem. This post is to provide you with safe, easy, valuable, scalable, Ansible playbooks you can copy, study, and modify to fit your infrastructure. I want to stress that the following code does not attempt to change, modify, add, remove, update, or delete any data or configurations. They simply connect, securely, to a target host or set of hosts, capture stateful facts, that is to say, truthful key-value pairs and lists of information about the current state or configuration, parse those facts, and then transform them into useable, human-readable, automated documentation.
TL:DR
– Documenting enterprise networks and servers is tedious work at best.
– Most enterprise documentation is, for a lack of a better word, wanting, if it exists at all.
– Various Ansible modules can be used to gather stateful, truthful, facts from infrastructure.
– Not limited to network devices. Windows, Linux, VMWare provide facts to Ansible as well.
– Easy.
– After you capture facts they are easily transformed into automated state documentation.
– RAW JSON, Nice JSON, Nice YAML, CSV (spreadsheets!), Markdown, and interactive HTML mind maps from Ansible facts.
– Scales n+x devices.
– Safe, secure, no possibility of disrupting the network. Think of it as running a bunch of show commands or doing HTTP GETs.
– Loved by management everywhere.
Enter: Ansible
If you are familiar with me at all you likely already know Ansible is my automation tool of choice. If you are new around here – let me tell you why. I believe Ansible is so easy that I can write a simple blog post with a few lines of code that you should be able to reproduce and make it work for you. There is little to no barrier to entry and your solution complexity will scale along with your personal growth and muscle memory with the tool. So let’s get started.
Linux
You are going to need a Linux environment. If you are a traditional Windows user who may not have access to a RHEL, CentOS, Debian, Ubuntu, or other Linux platform you can use the Windows Subsystems for Linux (WSL2) on Windows 10 to run a Linux environment.
For example to install Ubuntu on Windows 10:
Right-click the Windows Start icon – select Apps and Features.

In the Apps and Features window – click Programs and Features under Related Settings on the right side of Apps and Features.

Click Turn Windows Features On or Off in the left (with the shield icon) side of the Programs and Features window.

Scroll to bottom of the Features window and put a check mark beside Windows Subsytem for Linux; Click Ok and close the open windows.

Launch the Microsoft Store.

Search for Ubuntu – click the first result.

Click Install.

Wait for Ubuntu to install.
Press Windows Key and start typing Ubuntu – click and launch Ubuntu.
The first time Ubuntu launches it has to setup – give this some time.
Enter your username and password for Ubuntu.
Update Ubuntu – this step will take some time.
$ sudo apt update
$ sudo apt-get upgrade -y
Install Ansible
Make sure Python is installed.
$ sudo apt-get install python -y
Install Ansible.
$ sudo apt-add-repository ppa:ansible/ansible
$ sudo apt-get update
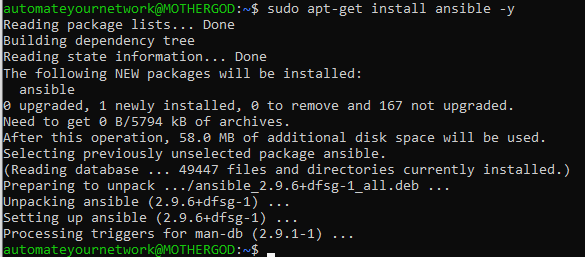
$ sudo apt-get install ansible -y
hosts
You will need a hosts file. This is the foundation for a good, scalable, modular Ansible install base. Hosts can be organized hierarchically to match your physical or logical topologies. The machine hosting Linux must be able to resolve the hosts if you use their hostname and have IP connectivity for the playbooks to work. For a standard Cisco enterprise design you might have a hosts file like this:
[ENTERPRISE:children]
CAMPUS
WAN
[CAMPUS:children]
CORE
DIST
ACCESS
[CORE]
core.my.domain.com
[DIST]
dist01.my.domain.com
dist02.my.domain.com
[ACCESS]
access01.my.domain.com
access02.my.domain.com
access03.my.domain.com
[WAN]
wan_router01.my.domain.com
wan_router02.my.domain.com
Connectivity
Ansible needs to be able to securely connect to the targeted host. There are no agents and Ansible uses SSH, WinRM, or HTTPS as transport protocols. For most devices a username and password are required to authenticate and authorize the Ansible session. There are a few ways that this can be handled but for beginner’s I would setup a prompted mechanism to get going. Eventually you can learn about Ansible Vault but to avoid hard coding plain-text passwords to get started, a mistake even I made when I was beginning to use Ansible, start with prompted interactive playbooks where a human has to enter a username and password.
These connections strings are first setup in what’s known a group variable or group_vars where all of the individual hosts in a group (ie dist01 and dist02 in DIST group) inherit the variables set. Because we have everything nested in [ENTERPRISE], in a folder called group_vars, create the following file.
ENTERPRISE.yml
—
ansible_connection: network_cli
ansible_network_os: ios
ansible_user: “{{ hostvars[inventory_hostname][‘ios_password’] }}”
ansible_ssh_pass: “{{ hostvars[inventory_hostname][‘ios_password’] }}”
This tells all the hosts in the Enterprise hosts group to use the Ansible network_cli connection mechanism; that the target operating system is Cisco IOS; and that the Ansible user and Ansible passwords are variables.
Playbooks
At the heart of Ansible are playbooks. Playbooks are YAML files made up of key-value pairs and lists of serially executed tasks. The first step in the playbook is to establish the scope of the playbook tasks from either a group or single host in the hosts file or locally using the localhost option. For this example target the Campus Access layer. One of the tasks in these facts playbooks will either call a specific facts module (like ios_facts), use the setup module, or target an API using the uri module. But first, we have to prompt the user for their credentials and store them in variables to be used by the Ansible connection strings in the group vars files.
Create a file called CiscoAccessFacts.yml inside the playbooks folder as follows:
—
– hosts: ACCESS
vars_prompt:
– name: ios_user_prompt
prompt: “Enter Cisco IOS Username”
private: no
– name: ios_password_prompt
prompt: “Enter IOS Password”
private: yes
tasks:
– set_fact:
ios_user: “{{ ios_user_prompt }}”
ios_password: “{{ ios_password_prompt }}”
no_log: true
delegate_to: localhost
run_once: true
Now that we have connection to our devices in the ACCESS group using the prompted credentials which are passed to the group_vars Ansible connection strings we are ready to perform the actual IOS Facts Ansible task as follows:
– name: Gather Ansible IOS Facts
ios_facts:
gather_subset:
– all
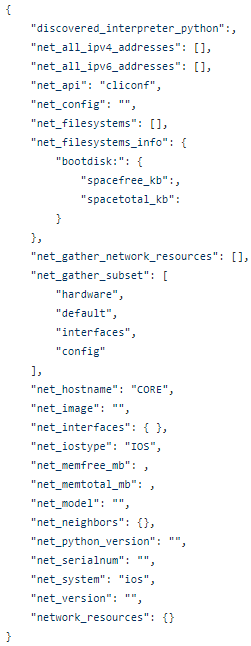
That’s it! Now we have captured the Ansible IOS Facts. Because these are Ansible facts we do not need to register them as a variable; they are stored in the ansible_facts magic variable.
To print your facts to the screen you can use the Ansible debug with the following message as the next task in your playbook:
– debug:
msg=”{{ ansible_facts }}”
Save and run the file.
ansible-playbook CiscoAccessFacts.yml
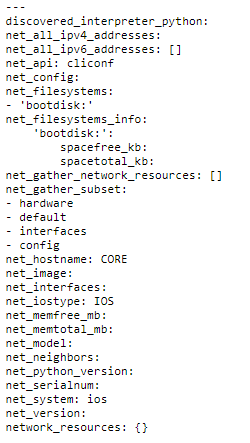
Answer the prompts for credentials. After authenticating and gathering the facts something like this should be displayed on the screen, except with actual data values completed.
Cisco NXOS_Facts
Much like IOS, Ansible has an NXOS fact module as well. The NXOS module, as expected, provides the same baseline facts as IOS but adds hardware facts such as modules, fans, and power supplies as well as software facts such as features, licensing, and VLANS.
Copy the Campus files and update them accordingly. Typically in a data center where the NXOS facts will gather there is HA configured and paired-devices. These playbooks have been tested on Nexus 9000, Nexus 7000, Nexus 5000, and Nexus 2000 FEX modules.
hosts
[DC_CORE]
DC_CORE01
DC_CORE02
[DC_ACCESS]
DC_ACCESS01
DC_ACCESS02
DC_ACCESS03
DC_ACCESS04
group_vars\DC_ACCESS.yml
—
ansible_connection: network_cli
ansible_network_os: nxos
ansible_user: “{{hostvars[inventory_hostname][‘nxos_user’]}}”
ansible_ssh_pass: “{{hostvars[inventory_hostname][‘nxos_password’]}}”
Notice the change to nxos for the ansible_network_os. The variables are changed for cosmetics as well to match the NXOS platform.
playbooks\CiscoNXOSAccessFacts.yml
—
– hosts: DC_ACCESS
vars_prompt:
– name: nxos_user_prompt
prompt: “Enter Cisco NXOS Username”
private: no
– name: nxos_password_prompt
prompt: “Enter NXOS Password”
private: yes
tasks:
– set_fact:
nxos_user: “{{ nxos_user_prompt }}”
nxos_password: “{{ nxos_password_prompt }}”
no_log: true
delegate_to: localhost
run_once: true
– name: Gather Ansible NXOS Facts about DC Access
nxos_facts:
gather_subset:
-all
– debug:
msg=”{{ ansible_facts }}”
Save and run the playbook.
ansible-playbook CiscoNXOSAccessFacts.yml
Review the output on the screen and notice the new sets of facts only NXOS can provide.
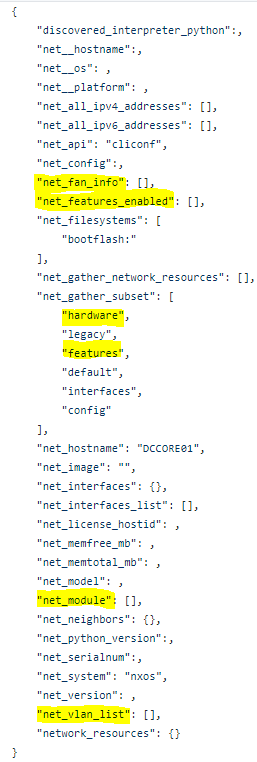
Notice again the change from ios_facts to nxos_facts but that’s about it. Now you have all of your Data Centre Ansible Facts as well as your Campus!
This is great right? What other facts can we get? How about compute facts! Yes that’s right we can use Ansible to get Windows, Linux, and VMWare (bare metal or virtual guest) facts too using more or less the same steps.
Compute Facts
Ansible is not limited to gathering facts from Cisco or other network devices. In fact Ansible can be used to gather even more facts from compute platforms like Microsoft Windows, Linux of any flavour, and VMWare (both bare metal hosts and virtual guests).
Microsoft Windows Facts
That’s right. We can use Ansible, a Linux-only tool, to gather Microsoft Windows facts! More or less the same approach and building blocks are the same; a hosts file, group vars file, and playbook. Windows hosts, like Cisco hosts, can be logically organized anyway you see fit. Windows hosts can be grouped by product line, OS, function, location, or other values. For now create a simple hosts file with one parent group called Windows.
The requirements and WinRM installation and configuration guide can be found here. Either HTTP or HTTPS can be used because Kerberos is ultimately securing the payload, even if the transport is only HTTP.
hosts
[Windows]
Server01
Server02
The group vars Ansible connectivity variables for Microsoft Windows are as follows:
group_vars\Windows.yml
—
ansible_user: “{{hostvars[inventory_hostname][‘windows_user’]}}”
ansible_password: “{{hostvars[inventory_hostname][‘windows_password’]}}”
ansible_winrm_scheme: http
ansible_port: 5985
ansible_connection: winrm
ansible_winrm_transport: kerberos
Note the Ansible WinRM scheme needs to be setup as either HTTP or HTTPS and the corresponding Ansible port (5985 for HTTP; 5986 for HTTPS) needs to be selected depending on the transport protocol. Ansible connection is using WinRM and the WinRM transport is specified as Kerberos.
Now in the playbook target the Windows group of hosts and use the same prompted mechanism code as before updating it to reflect Windows cosmetically. The only change to the Facts task is to change from the ios or nxos facts module to the setup module.
– name: Gather Ansible Windows Facts about Windows hosts
setup:
gather_subset:
-all
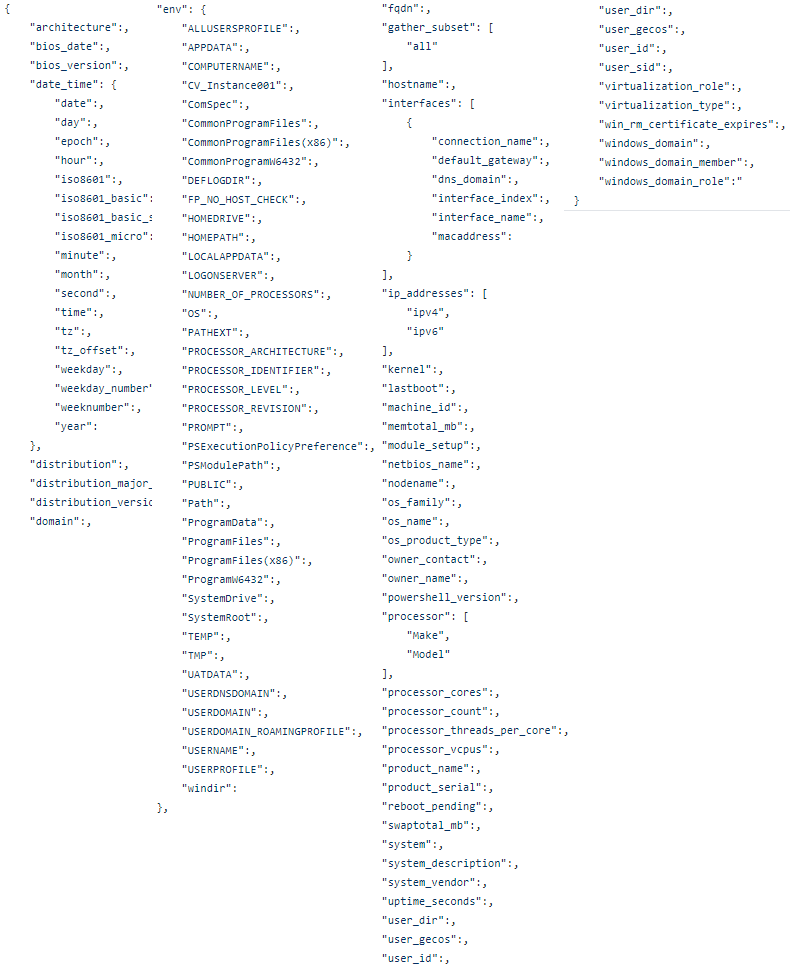
– debug:
msg=”{{ ansible_facts }}”
Save the playbook as playbooks/WindowsFacts.yml and run the playbook.
ansible-playbook WindowsFacts.yml
Notice all of the amazing facts Ansible can discover about a Windows host or groups of Windows hosts.
Linux Facts
The great thing about the setup module is that it can be used against Windows and Linux hosts. Meaning you simply need to clone the Windows artifacts (group_vars file, playbook, and hosts inventory) and refactor all of the Windows references to Linux (Linux.yml group var file; [Linux] hosts list; Windows to Linux cosmetic references) but the core Ansible task remains the same:
– name: Gather Ansible Linux Facts about Linux hosts
setup:
gather_subset:
-all
– debug:
msg=”{{ ansible_facts }}”
However, much like IOS vs NXOS facts, the amount of Linux facts eclipses even the huge list of facts from the Windows hosts. This is due to the native Ansible / Linux coupling and support.

VMWare
VMWare does not use the generic setup module and has a specific facts module like Cisco IOS or NXOS. VMWare facts actually use the downstream VSphere API and there are 2 additional required fields in addition to an authorized username and password; hostname and esxi_hostname. This module, vmware_host_facts gathers facts about the bare metal hosts; not the virtual guests. From my testing I found it best to target the hostname and esxi_hostname using the esxi hostname in the Ansible hosts inventory file.
– name: Gather vmware host facts
vmware_host_facts:
username: “{{ vmware_user }}”
password: “{{ vmware_password }}”
hostname: “{{ inventory_hostname }}”
esxi_hostname: “{{ inventory_hostname }}”
– debug:
msg=”{{ ansible_facts }}”
Very rich JSON similar to that of Linux are provided back including all hardware information about virtual NICs, VMWare datastores, BIOS, and processors.
Microsoft Azure
Even clouds have Ansible Facts! Azure Facts are actually even easier to retrieve because of the simplified authentication mechanism. Username and password still works or you could setup Service Principal Credentials. Inside Azure you need to create an account with at least API read-only permissions. There are some prerequisites to install. First pip install the Ansible Azure libraries.
$ pip install ‘ansible[azure]’
You can create the following file $HOME/.azure/credentials to pass credentials to the various Azure modules without username and password prompts or credential handling.
[default]
subscription_id=xxxxxxx-xxxx-xxxx-xxxx-xxxxxxxxxxxx
client_id=xxxxxxx-xxxx-xxxx-xxxx-xxxxxxxxxxxx
secret=xxxxxxxxxxxxxxxxx
tenant=xxxxxxx-xxxx-xxxx-xxxx-xxxxxxxxxxxx
In the list of Ansible cloud modules find the Azure section. Each Azure module has two components – a config module and an info (facts) module.
Using the same process, along with JSON_Query, and a with_together loop, for example, capture all Azure Virtual Network info. First we have to capture the Azure resource groups and then pass the resource group along to a second API to get the associated networks.
– name: Get Azure Facts for Resource Groups
azure_rm_resourcegroup_info:
register: azure_resource_groups
– name: Get Azure Facts for all Networks within all Resource Groups
azure_rm_virtualnetwork_info:
resource_group: “{{ item.0 }}”
register: azure_virtual_network
with_together:
– “{{ azure_resource_groups | json_query(‘resourcegroups[*].name’) }}”
Ok great. So what? What can I do with these facts?
So far we have simply dumped the facts to console to explore the various modules. What I like to do with these facts is to create living, automated, stateful, truthful, human-readable, management and operations loves me for it, documentation. With a little work and changing the playbooks from interactive on-demand playbooks to non-interactive fully scheduled and automatically executed periodically these playbooks can now run all by themselves creating snapshots of state in the form of reports.
First I like to capture the RAW JSON as a forensic artifact. The raw facts unchanged and unfiltered, in case audit, compliance, security, or other possible downstream machine code that requires unchanged RAW JSON.
This is easily done in Ansible using the copy module. We have the RAW JSON in a variable, the Ansible magic variable {{ ansible_facts }}, we just need to copy it into a file.
We will need a repository for the new output files so create a documentation folder structure with subfolders for your various platforms.
Add the following line of code, customizing the output file name based on the playbook environment, after the debug. For example the IOS Access Facts playbook.
The Ansible magic variable {{ inventory_hostname }} can be used to reference the current iterated inventory host file target which we will use to identify the parent switch for each of the facts.
– name: Create RAW JSON file
copy:
content: |
{{ ansible_facts }}
dest: ../documentation/FACTS/CAMPUS/ACCESS/{{inventory_hostname}}_IOS_Facts_RAW.json
Save and re-run the playbook. All the IOS facts will now be, albeit ugly and unusable, stored in a RAW JSON file.
to_nice filters
Ansible has various filters that can be used to help parse or transform data. Using two of these filters, to_nice_json and to_nice_yaml, we can create human-readable, nice, pretty, and easy to consume JSON and YAML files.
Simply copy and paste the Create RAW JSON file task and modify the new stanzas as follows:
– name: Create Nice JSON file
copy:
content: |
{{ ansible_facts | to_nice_json }}
dest: ../documentation/FACTS/CAMPUS/ACCESS/{{inventory_hostname}}_IOS_Facts_Nice.json
– name: Create Nice YAML file
copy:
content: |
{{ ansible_facts | to_nice_yaml }}
dest: ../documentation/FACTS/CAMPUS/ACCESS/{{inventory_hostname}}_IOS_Facts.yml
Save and re-run the playbook. Now you should have 2 human readable files. The _Nice.json (displayed in the first screenshot) file and now an even easier to read YAML file:
Traditional Reports from Facts
While the RAW and Nice JSON and YAML files are great for programming, data modeling, logic, templating, and other infrastructure as code purposes they are still not exactly consumable by a wider audience (management; operations; monitoring; capacity planning). Using Ansible’s ability to parse the registered variable JSON and another filter, JSON_Query, an SQL-like tool used to query and parse JSON, we can capture individual fields and place them into CSV or markdown ordered structure.
First we are going to use Ansible’s set_facts module to create our own variables out of the key-value pair and lists in JSON which we can then re-use to create reports.
For IOS Access Facts set the following facts:
– name: Set Facts
set_fact:
image: “{{ ansible_facts[‘net_image’] }}”
version: “{{ ansible_facts[‘net_version’] }}”
serial: “{{ ansible_facts[‘net_serialnum’] }}”
model: “{{ ansible_facts[‘net_model’] }}”
ip_addresses: “{{ ansible_facts[‘net_all_ipv4_addresses’] }}”
disk_total: “{{ ansible_facts | json_query(‘net_filesystems_info.bootdisk.spacetotal_kb’) }} “
disk_free: “{{ ansible_facts | json_query(‘net_filesystems_info.bootdisk.spacefree_kb’) }}”
CSV
Now that we have set our own facts / variables from the JSON facts we simply put them into order to create a CSV file.
– name: Create Cisco IOS Access Facts CSV
copy:
content: |
{{ inventory_hostname }},{{ image }},{{ version }},{{ serial }},{{ model }},{{ disk_total }},{{ disk_free }}
dest: ../documentation/FACTS/CAMPUS/ACCESS/{{ inventory_hostname }}_IOS_facts.csv
Some of the RAW JSON characters need to be cleaned up to pretty up the CSV file. The Ansible replace module can be used in combination with Regular Expression (RegEx) to clean up the file as follows:
– name: Format and cleanup CSV
replace:
path: ../documentation/FACTS/CAMPUS/ACCESS/{{ inventory_hostname }}_IOS_facts.csv
regexp: ‘[|]|”‘
replace: ”
– name: Format and cleanup CSV
replace:
path: ../documentation/FACTS/CAMPUS/ACCESS/{{ inventory_hostname }}_IOS_facts.csv
regexp: “‘”
replace: ”
Now we can add the header row to the CSV using Ansibles lineinfile module.
– name: Header Row
lineinfile:
path: ../documentation/FACTS/CAMPUS/ACCESS/{{ inventory_hostname }}_IOS_facts.csv
insertbefore: BOF
line: Hostname,Image,Version,Serial Number,Model,Total Disk,Free Disk
Save and re-run the playbook. You should now have a CSV file that looks similar to this but with data values in the rows following the header row.

Markdown
Think of markdown as HTML-lite. Markdown reports from facts render nicely in browsers or VS Code with the Markdown Preview extension. More or less the same process as the CSV file place the variables between pipes and create a header row. Markdown has strict rules to make well-formed .md files so pay close attention.
– name: Create Cisco IOS Access Facts Markdown
copy:
content: |
| {{ inventory_hostname }} | {{ image }} | {{ version }} | {{ serial }} | {{ model }} | {{ disk_total }} | {{ disk_free }} |
dest: ../documentation/FACTS/CAMPUS/ACCESS/{{ inventory_hostname }}_IOS_facts.md
(There is more formatting clean up required which you can find in the GitHub repo links at the bottom)
Using the Ansible looping mechanism, with_items, we need to create 3 header rows for the valid markdown file as follows:
– name: Header Row
lineinfile:
path: ../documentation/FACTS/CAMPUS/ACCESS/{{ inventory_hostname }}_IOS_facts.md
insertbefore: BOF
line: “{{ item.property }}”
with_items:
– { property: ‘| ——– | —– | ——- | ————- | —– | ———- | ——— | ‘ }
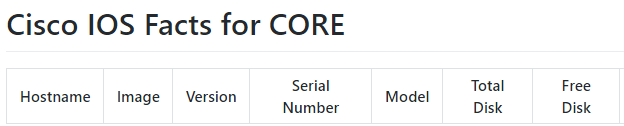
– { property:’| Hostname | Image | Version | Serial Number | Model | Total Disk | Free Disk |’ }
– { property:’# Cisco IOS Facts for {{ inventory_hostname }}’ }
This generates a mark down file like this:
Mark Map / Interactive HTML Mind Map
Now that we have a well-formed markdown file we can use a relatively new tool to create a relatively new file type. Markmap is a node.js tool that can be used to transform any markdown file into an interactive HTML mind map.
First install the required libraries (node.js and npm)
curl -sL https://deb.nodesource.com/setup_12.x | sudo -E bash –
Then add the following task after the markdown task.
– name: Generate Cisco IOS Access Facts Mind Map
shell: “npx markmap-cli ../documentation/FACTS/CAMPUS/ACCESS/{{ inventory_hostname }}_IOS_facts.md”
register: markmap
This will generate an interactive HTML page with a mind map of the markdown like this:

Summary
Ansible facts are a great way to get started with network automation and working with infrastructure as code. They are safe, non-intrusive, valuable, and typically management approved playbooks to get you started towards configuration management. They are also a great way to document that enterprise network you’ve been neglecting. Using these simple tools and techniques your full enterprise network, from campus to data centre; cloud to WAN; Cisco to Microsoft to Linux to VMWare to Azure or AWS; can be automatically documented with real time stateful facts!
GitHub Repositories
Here are a collection of Automate Your Network developed GitHub repositories you can use to explore the code or even transform into playbooks customized for your environment.