
“We become what we behold. We shape our tools, and thereafter our tools shape us.”
― Marshall McLuhan
My first attempt at network automation I used the tools that I had used to manage infrastructure with for the past 20+ years. A file editor (notepad) and a file transfer program (WinSCP) on my Windows 10 machine and a Linux (CentOS (at the office) / Ubuntu (at home)) machine. Ansible was the first new tool introduced to me and every other tool here has followed to either support my Ansible development or I was led down the path to discovery because of Ansible. So – installed Ansible on the Linux environment at the office and made sure it had SSH connectivity to my in-band management network.
Ready to go! I had everything I needed to write YAML files and make my playbooks, group / host variable files, and inventory file. I could either write these in Notepad in Windows and transfer them to Linux or just “vi” them directly on Linux. All set right?
As a beginner trying to orchestrate a series of serially executed commands in Ansible playbook tasks I was suffering from a mix of ignorance and arrogance. I didn’t know what I didn’t know. And while yes, my playbook would eventually go onto be successful and make a large scale, complex, change across multiple devices without causing an outage of any kind, the process was brutal. Back and forth trial and error with all of these, what turned out to be, unnecessary steps of trying to track my latest version of working code across my development environments.
Shameful filenames like “John_Working_Code_v2_latest_new02.yml” were sprawling out of control and I was starting to feel like a “The Price is Right” contestant where they guess the value of 5 items, pull a lever to see how many they got right, then run back and guess again and try to figure out which ones were correct, then run back and pull the lever again.
Eventually I got all 5 items priced correctly but it was a lot of panic-driven, chaotic, running around, as it turns out, for no reason.
Was there a better way? Surely this isn’t what people mean when they say DevOps or infrastructure as code or network automation. Why would anyone do it this way? It doesn’t scale. It took weeks longer than had I just logged into each router at the CLI and configured the device manually by hand.
Ansible wasn’t that hard – but the tools I was using were simply wrong. Enter the modern toolkit.
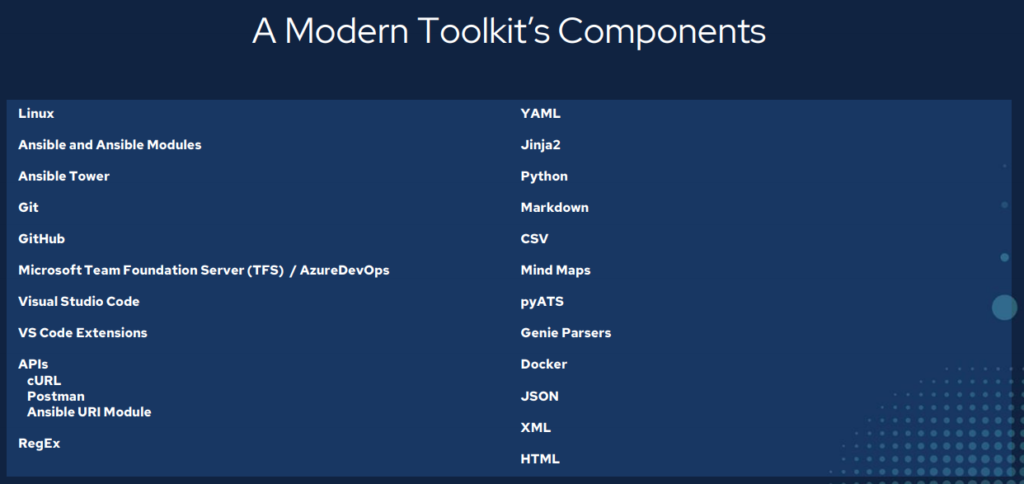
TL:DR
– This toolkit took about three years to put together through a lot of hard work and discovery.
– Tools make all the difference.
– You need an Integrated Development Environment (IDE).
– Version and source control are good things. They are not just middle management talk.
– Network automation means treating infrastructure as code.
– You have crossed over from IT into Development; act accordingly.
– Use software development tools to solve software development problems.
– Git. Git. Git. Git. Git. Git.
– Powerful stuff.
– Leads to Continuous Integration / Continuous Delivery (CI/CD) in the long run.
– Both for configuration management as well as state capture, validation, and testing.
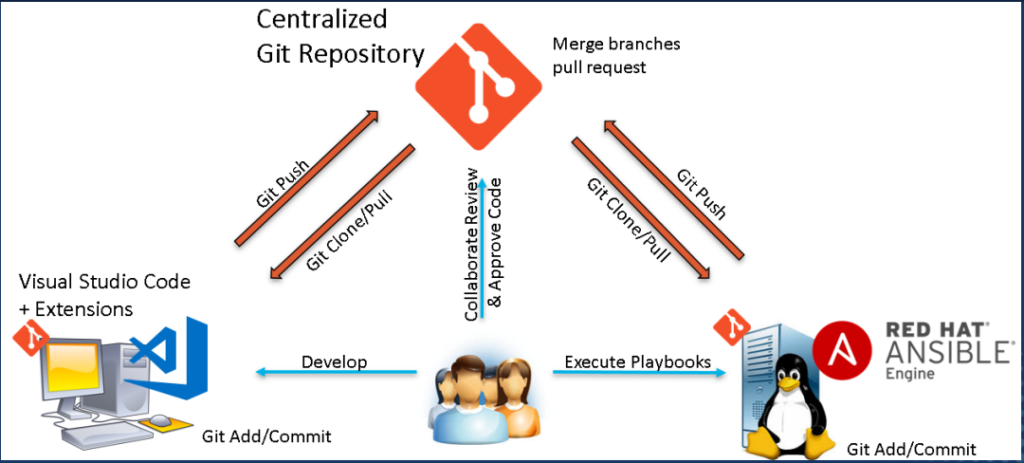
Version / Source Control – Git
I start with Git because in order of software installation Git should come first. You want to build up a development environment in order to work with infrastructure as code and you want to have both version (current, working, code; previous working code; testing new things without affecting old working things) and source (source of truth, which copy is the master copy / primary copy / main copy, allow for distributed development) controls (like RBAC but over your code base). For Windows you need to download and install Git (first, before your IDE so Git can be integrated when you install your IDE). But for Linux Git comes pre-installed as a standard.
Git vs GitHub
Git is not GitHub and GitHub is not Git.
Git is the actual software that does the version and source control. Git creates a hidden .git folder that tracks changes inside that Git-enabled folder. Git has commands used to work with code.
GitHub is an online Git repository. The largest collection of code in the universe GitHub provides a free place to store Git repositories (the folder with the .git subfolder tracking all artifacts within the parent folder). GitHub, or other Git hosting repository sites or services, provides the source control over your infrastructure as code.
Git is used to clone Git repositories (GitHub or other Git repository hosting site) locally, that is take a full copy of the remote repository locally, where developers can make changes and then push those changes back into the remote repository.
Branching
Git uses branching as it’s version control system. A main branch (previously and sometimes still referred to as master) serves as the known-good, stable, current, source of truth, intent; the master copy of a key for example.
A branch, another full copy of the code with a different identifier from main/master, can be created for development purposes. Bug fixes, feature releases, scaling, or routine changes can be done within a branch, protecting the main branch, and once tested and QA has been performed, the branch is merged through a mechanism known as a pull request, back into main, updating main’s artifacts accordingly.
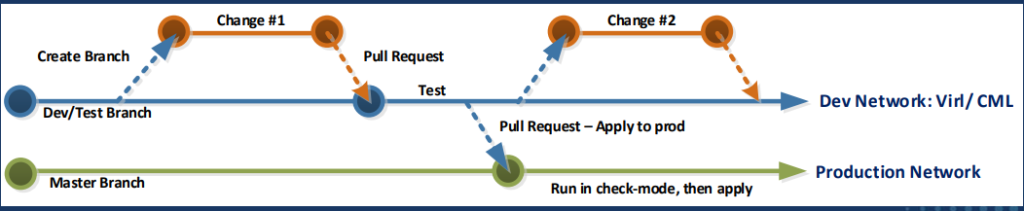
It might not seem obvious at first but in larger distributed development environments the pull request system allows for cross-team orchestration and collaboration. Pull requests can require approvals and reviews and can then also be used to trigger software builds and releases. The ever evolving history of a piece of infrastructure is completely documented and tracked in the pull request history handling the entire lifecycle of any given product, platform, or host.
My favourite Git-related sites:
IDE – VS Code
I love VS Code. I really do. After Git is installed download and install VS Code. VS Code is where you will be writing all of your code and reviewing the artifacts your code generates. It is fully Git integrated and aware and things like Git clone, Git add, Git commit, and Git push are all simply point-and-click operations. Split-screen editing, syntax checking, and a vast library of extensions make VS Code my number one pick for an IDE.
VS Code Extensions
Extensions are plug-ins you can install to further enhance VS Code’s already awesome capabilities. There are thousands of extensions available out there. Here is my VS Code extension list that I find helps enhance my infrastructure as code development experience.
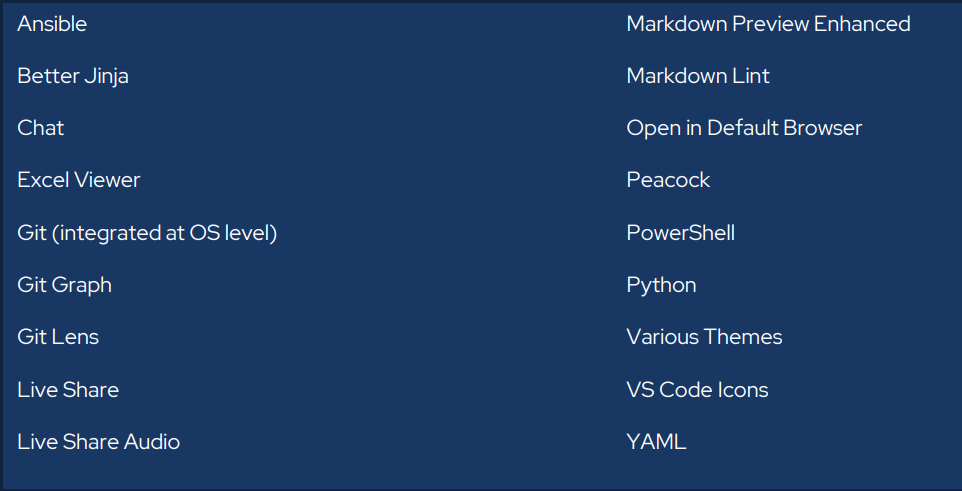
My favourite extension:
Development Services – Microsoft AzureDevOps
Formerly Microsoft Team Foundation Server (TFS), AzureDevOps provides development services for distributed development teams in the form of work boards (KANBAN; other Agile systems; waterfall), Git repositories, software builds, tests, and software releases allowing for full CI/CD DevOps.
ADO has the advantage, for me, as being an on-prem / private cloud solution with full enterprise controls (RBAC; AD integration) and feature sets.
Git repositories can transition to SSH key authentication. Docker container images can be build and deployed based on Git triggers and actions which build and deploy Ansible playbooks automatically.
Rich history, version and source controls, and an amazing collaboration space – particularly around Git Pull Requests – which fully enable and charge up infrastructure as code development. Adapt and adopt Agile practices to infrastructure teams.
Docker Integration
Moving towards infrastructure as code and full CI/CD in AzureDevOps Docker has become a very important tool and a key component of my success in DevOps. A Docker container image can be thought of as an immutable CD-ROM/DVD-like ISO (hence the “image” part) which can run, self-contained and without the need for a full blown hypervisor like VMWare or Hyper-V, an operating system and software inside of it. Docker images can be interactive and you can “log into” / shell into them, but any changes made inside this session are discarded when the session ends. Ansible and pyATS can both be “containerized” and run inside Docker container images.
Why is this important?
It allows me to setup a software build (create a Docker container image based on a specified Dockerfile) and software release in AzureDevOps CI/CD pipeline. Now any Ansible playbook or pyATS test I previously scheduled with a human operator executing the automation to fully automated and human-independent CI/CD that is trigger based on Git actions like Pull Requests.
A quick approach to Docker:
– Make it work at the CLI.
– Wrap this / convert this to Ansible playbook.
– Wrap the Ansible playbook in Docker.
– Build and release Docker image based on Git actions that trigger the CI/CD.
A sample infrastructure as code build:
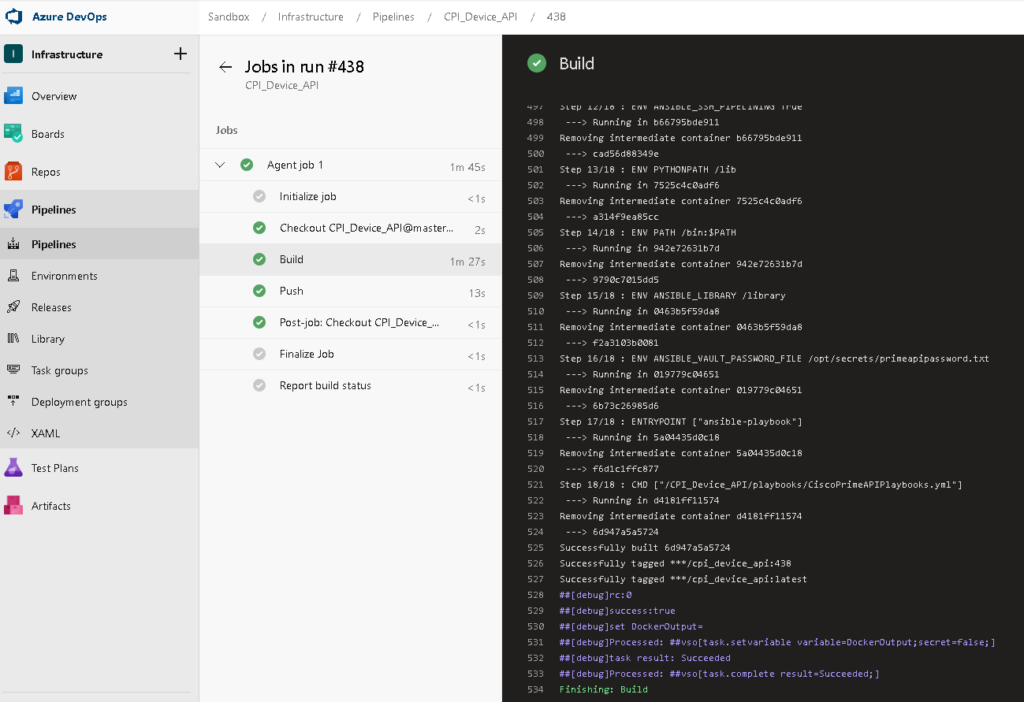
And the matching release:
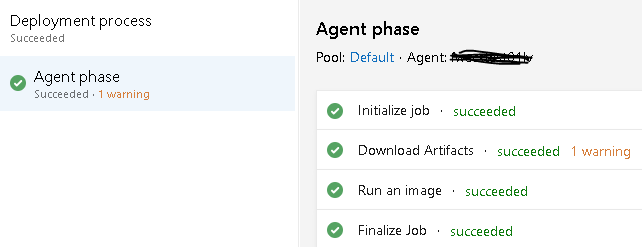
With detailed logs showing the Ansible playbook and Docker status.
Automation Tool – Ansible
After discovering Ansible in April of 2017 my entire approach to solving infrastructure problems changed. Now I work with an automate-first principal and nearly every solution I’ve developed in the past three years has been an Ansible playbook of some kind. It really has been a one-size-fits-all tool for me. Cisco, Microsoft, Linux, VMWare, Azure, anything with a RESTful API; Ansible has done it all for me.
My key points about Ansible:
– Simple, powerful, agentless.
– No previous coding skills required. This is not like learning Python from scratch.
– Can be used for anything from gathering facts, tactical one-time changes at scale, or full configuration management.
My full AnsibleFest 2020 deck if you want to dive deeper.
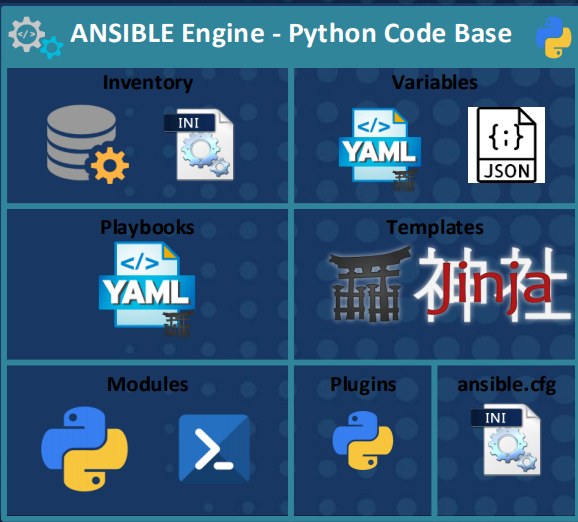
Ansible-related file types – YAML, JSON, Jinja2
The loaded term “infrastructure as code” or even “network automation” really boils down to the fact that you will be working with a few new file types to create artifacts like data models, templates and playbooks.
YAML Ain’t Markup Language (YAML)
YAML is a human readable data serialization language. In terms of Ansible both your data models (infrastructure represented as intent-based code) and playbooks (the file containing the serially executed tasks to perform) will be YAML files.
A data model for a switch might look like this:
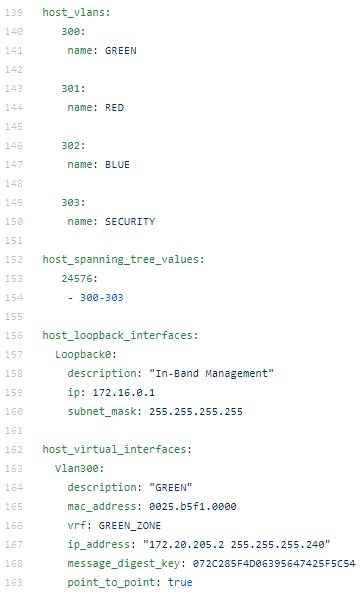
As you can see the file format is simple, made up of lists of key-value pairs, and very human readable. This represents the intent for this particular device.
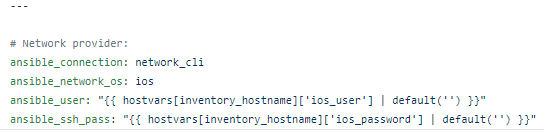
A playbook, on the other hand, might look like this:

This playbook is scoped for the CampusAccess group in the Ansible hosts inventory file. Prompts for username and password and then runs the ios_facts module printing the gathered facts on the screen.
JavaScript Object Notation (JSON)
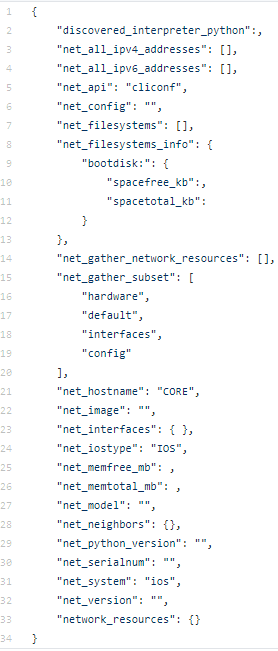
You may not need to write JSON but you should be able to consume JSON if you are working with Ansible. All Ansible facts, for example, are represented in JSON. This is much like a RESTful API that returns JSON in response to an HTTP GET. You may need to write JSON if you are POST / PUT (creating / updating) records with an API as the body of the HTTP POST / PUT will be JSON data.
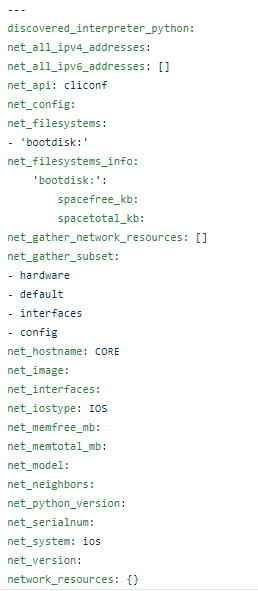
Ansible facts get returned by default like this as an example of an Ansible-related JSON artifact:
Jinja2
Jinja2 is Ansible’s (and Python’s) templating language. Saved as .j2 files, a Jinja template is exactly that – a template of another file type. Configuration stanzas, JSON, YAML, CSV, markdown, HTML, plain-text; more or less anything can be templated with Jinja2.
Logic is often applied inside a Jinja2 template such as For Loops or If Else End If declarations. Jinja2 also allows for the use of variables – which reference the original data model examples.
The VLANs from the data model of example could be templated for Cisco IOS as follows:
{% for vlan in host_vlans %}
vlan {{ vlan }}
name {{ host_vlans[vlan].name }}
{% endfor %}
I have written many more Cisco IOS Jinja2 templates you can check out.
Automated Documentation with Ansible filters – RAW JSON, Nice JSON, Nice YAML, CSV, Markdown, and Interactive HTML Mind Maps
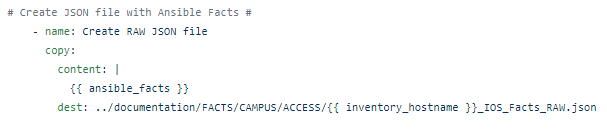
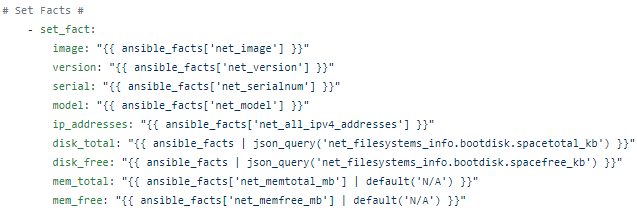
Probably my favourite, and often overlooked, Ansible capability is to generate automated network and infrastructure state documentation. I do this with Ansible filters. Starting with this simple playbook:
The Ansible magic variable – ansible_facts can be transformed. To simply take the RAW JSON inside ansible_facts you can use the Ansible copy module to copy them into a file:
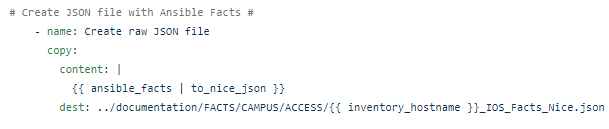
But using Ansible filters – adding | and then the filter, the ugly RAW JSON can be transformed into “nice” human readable JSON:
Or even better – Nice YAML!
Which looks like this:
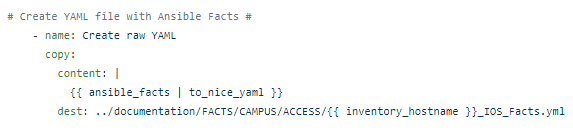
CSV and Markdown files can also be created using the ansible_facts JSON and another filter, JSON_Query, an SQL-like query tool used against JSON.
So we set_facts (create our own variables) from the parsed JSON:
Which we can then use to make CSV:

Or Markdown:

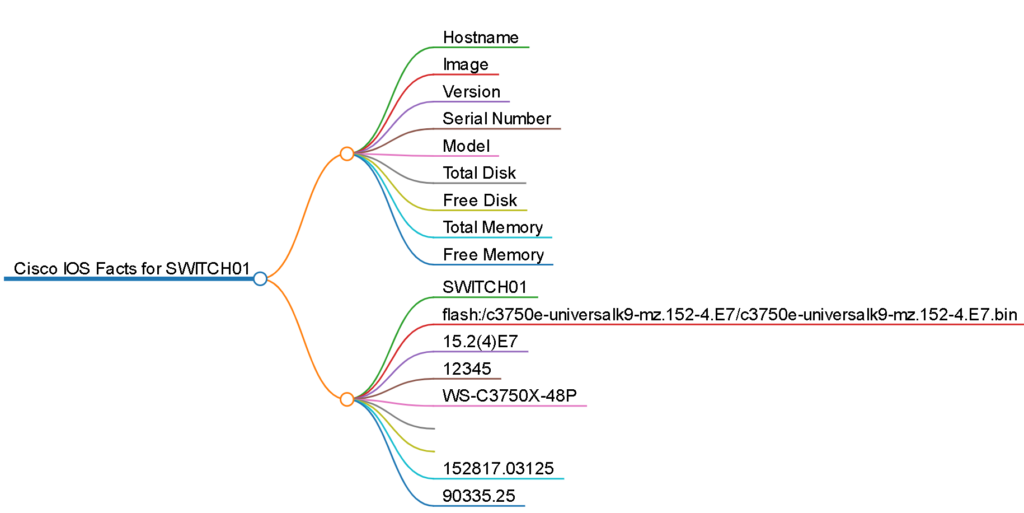
Mark Map
Mark Map is a nifty little program that converts any valid, well-formed Markdown file into an interactive HTML “mind map”.
You need to have node.js and npm installed in the Linux environment.
curl -sL https://deb.nodesource.com/setup_12.x | sudo -E bash –
Then simply run the one line command referencing the markdown file you want to convert to a mind map.
npx markmap-cli <filename>
The output, which is fully interactive, looks like this:
Ansible Vault
A big part of moving to CI/CD and automated builds and releases from human-driven automation is securing the credentials used to authenticate against any given infrastructure. As all of the infrastructure as code is in a central Git repository you don’t want to store your credentials in plain / clear text. One approach is to use prompted mechanisms for securely handling credentials but this does not lend itself to full autonomous automation in Docker containers.
Ansible Vault provides a way to encrypt full files or in our case specific variables, such as the credentials key-value. Once vaulted the encrypted variable can then be safely stored inside the Ansible group_vars file inside the Git repo for all to see. The matching password to unlock the variable can be provided at runtime (again counter intuitive) or, and this is my approach, saved in plaintext in a file in a secure location on the Linux host.
The magic happens at Docker container image runtime where the password file is mounted as a volume into the Docker image so the Ansible playbook can dynamically unlock the credential variables at runtime. Because the lock and key are separate this is a very secure way to automate Ansible with Docker safely.
To move from something like this, that uses prompted inputs from a human operator
Vaulted variables that can be run non-interactively

Use the Ansible Vault mechanism.
$ ansible-vault encrypt_string ‘string’ –name ‘variable_name’
Where ‘string’ is your enable secret for a Cisco IOS for example.
$ ansible-vault encrypt_string ‘My$ecretKey1’ –name ‘ansible_ssh_pass’
New Vault password: <A Strong Encryption password here>
Confirm New Vault password: <Repeat Strong Encryption password here>
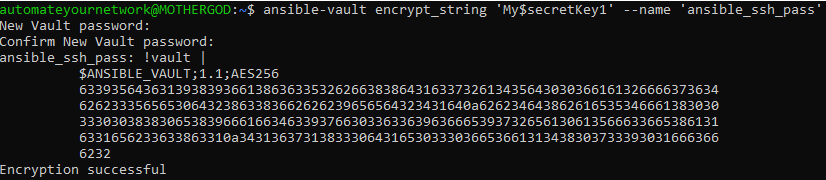
Now you can replace the ansible_ssh_pass variable with the vaulted password.
To make it fully non-interactive save your Vault password ( <A Strong Encryption password here>) to a plain-text file (yes it seems counter intuitive but this is fine and safe) saved somewhere secure on the Linux host.
sudo vi /etc/secrets/AnsibleVault.txt
< A Strong Encryption password here >
(ESC, wq! )
Then, in your ansible.cfg file stored in the same location as the playbooks add the following line under [defaults]
[defaults]
vault_password_file: /etc/secrets/AnsibleVault.txt
The playbook will now securely and automatically authenticate without the need for prompts or for insecurely saving naked credentials in the clear.
Latest tool – Application Programmable Interfaces (APIs) for Infrastructure
APIs have finally arrived for infrastructure in the form of RESTful interfaces on switches and routers, on the Cisco Catalyst 9000 series for example, and other appliances and web services. I have had great success with F5’s AS3 API. Cisco.com has amazing APIs. Cisco Prime Infrastructure and Cisco Identity Services Engine APIs are extremely capable and easy to use. BlueCat Address Manager has an API. They are popping up everywhere!
Command Line Interface: cURL
Client Uniform Resource Locator (cURL) is a command-line tool used to interact with an API. As of May 2018 cURL is even included in Windows by default.
Try it yourself – launch a command prompt (Start -> Run; cmd) and type in:
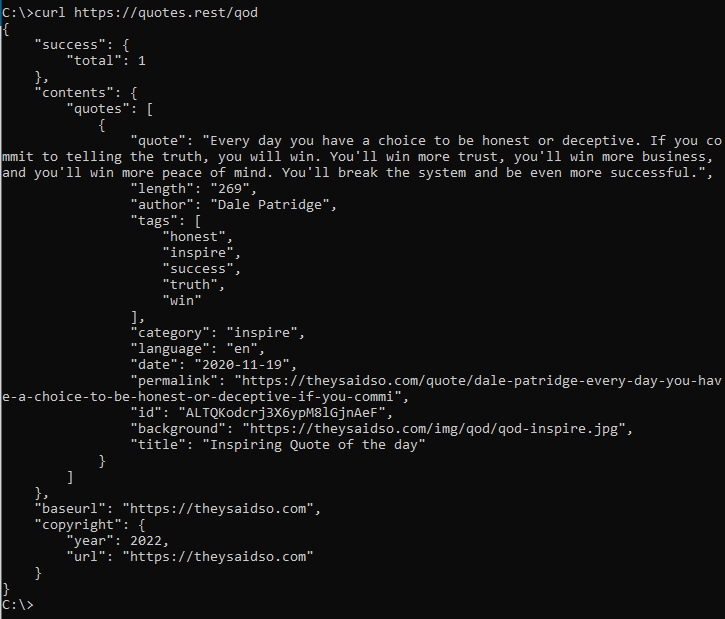
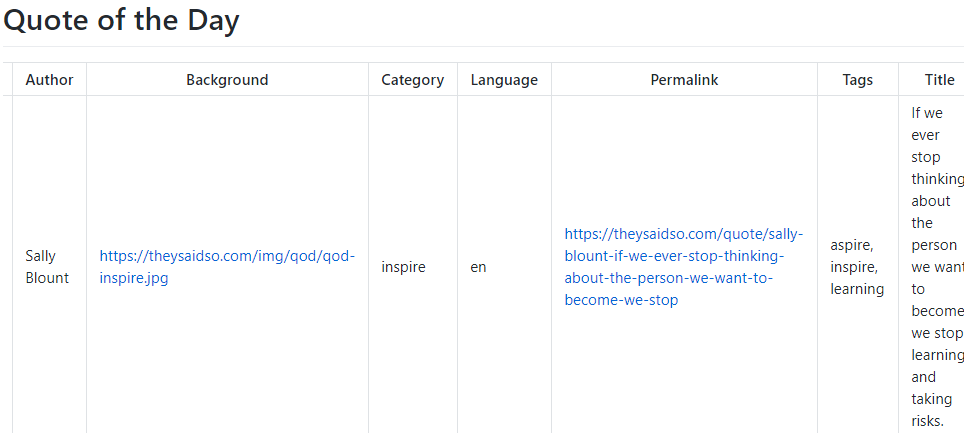
curl https://quotes.rest/qod
You should get back a Quote of the Day in JSON from the public open RESTful API:
Graphical User Interface: Postman
Postman is a GUI API client. Postman can be used for quick and simply API interactions but is also a very powerful API automation and development tool that should not be dismissed as just a simple API browser.
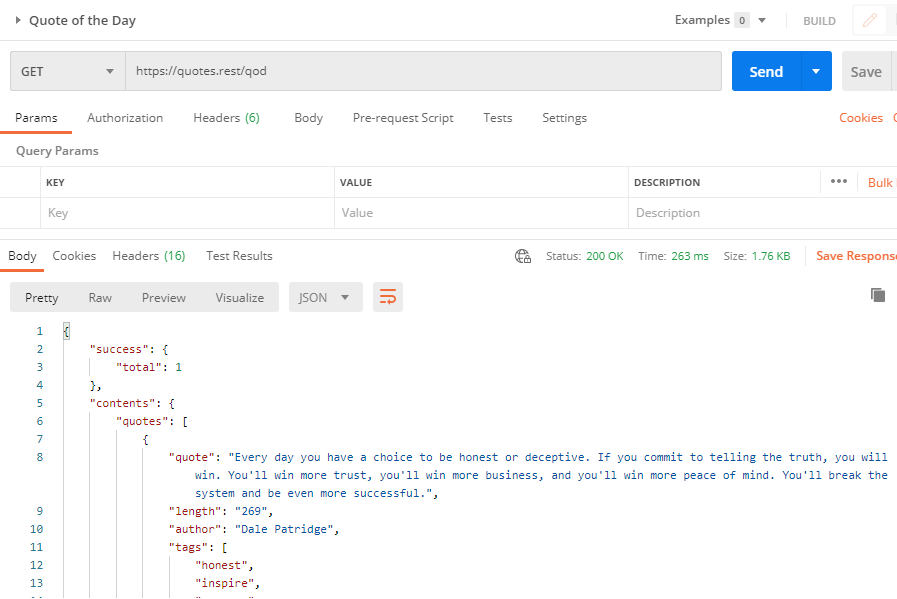
The same Quote of the API would look like this in Postman:
Automation: Ansible URI Module
Ansible has a universal module, the URI module, that allows for API automation. The follow Ansible playbook, quoteoftheday.yml, can be created to automate the Quote of the Day.

Using additional Ansible tools the JSON can be manipulated to create usable reports from the JSON.
The Quote of the Day playbook is available on Automate Your Network’s GitHub.
State Validation: Cisco Testing Automation Solution (CTAS)
The Cisco Testing Automation Solution (CTAS) is actually three distinct tool kits assembled in a pyramid / hierarchy.

The foundation here is parsing. Using the Genie library framework various infrastructure CLI commands are parsed and transformed into JSON output. From there pyATS can run automated boolean tests against the Genie parsed returned key-value pairs. xPresso is a GUI based ecosystem that provides for RBAC, scheduling, and much more advanced and easy to build testing workflows.
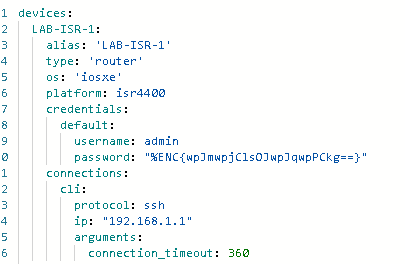
Similar to Ansible which has connection strings inside group variables CTAS uses testbed files which describe and provide shell connectivity to run the parsing and testing.
A sample testbed file for a Cisco ISR. Note the password is encrypted using pyATS cryptography methods.
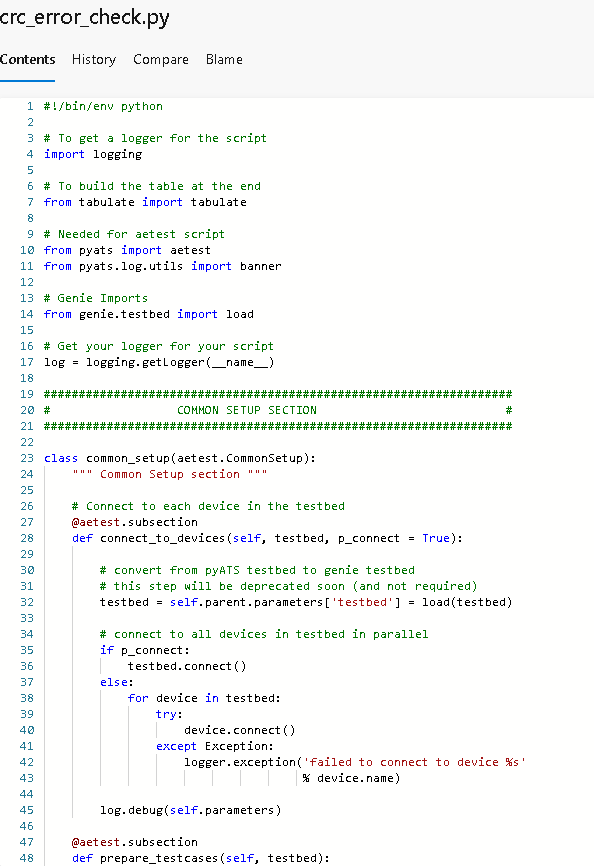
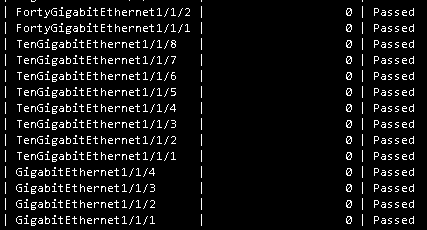
A sample crc_errors pyATS test file, written in Python. This test could be used with the ISR testbed to check for CRC errors on all interfaces.
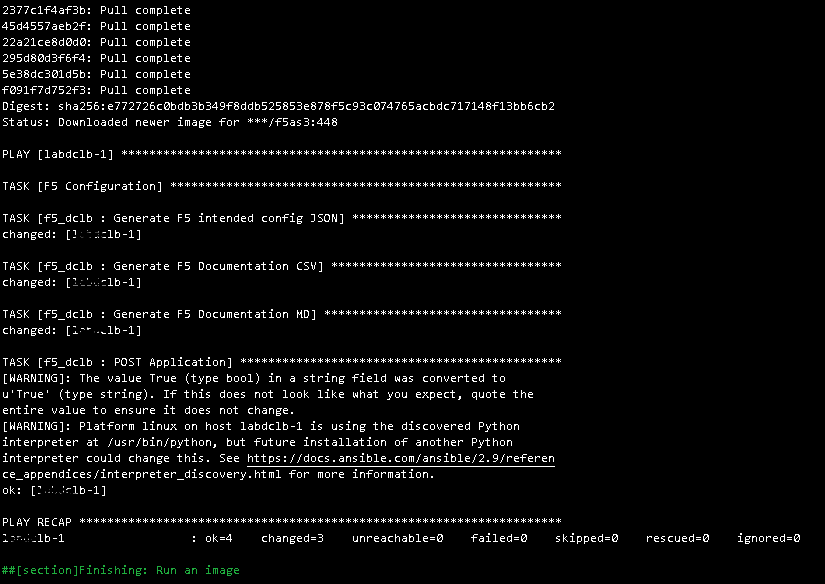
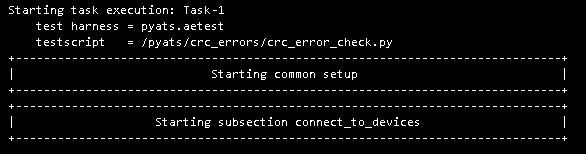
A sample log, taken from an AzureDevOps CI/CD release inside a Docker container image:

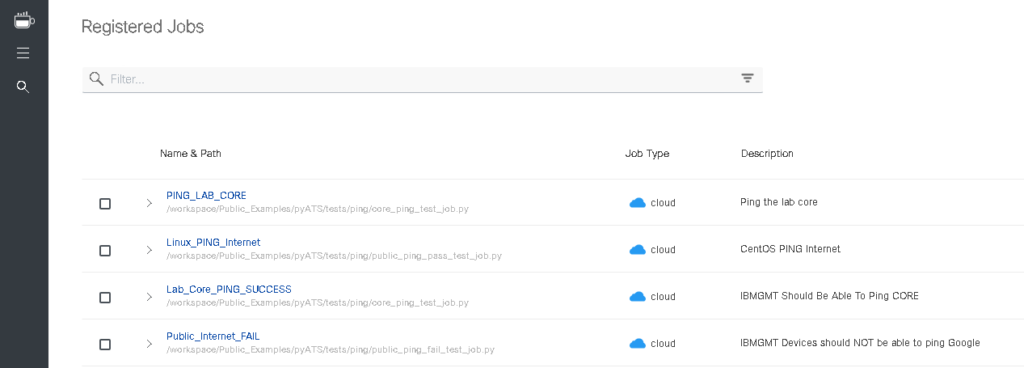
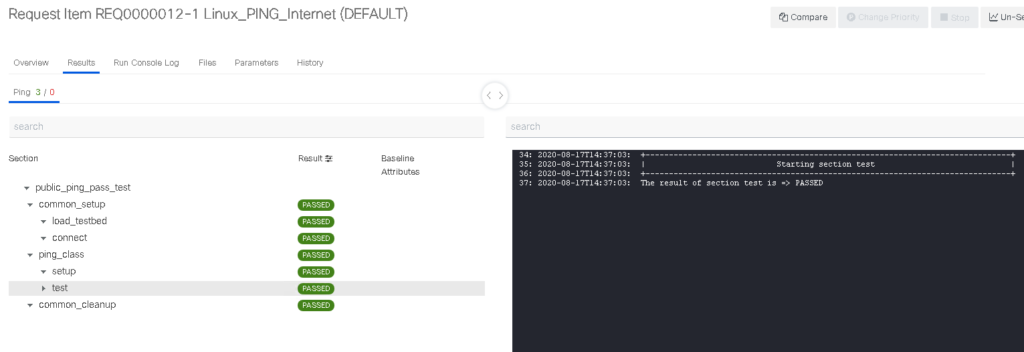
xPresso also offers the automation and orchestration capabilities:
Summary
Over the past three years my toolkit as a network engineer has grown dramatically from a humble text editor and a file transfer program to dozens of new tools each with their own amazing capabilities. In short – go get these tools and start using them to solve problems.
– Git
– VS Code
– VS Code Extensions
– GitHub account and repositories for public use
– AzureDevOps for Enterprise use
– Linux of any flavour
– Ansible
– Python
– Docker
– Postman
– cURL
– Ansible URI module
– YAML experience
– JSON experience
– Jinja2 templating experience
– Markdown experience
– HTML experience
– Mind map transformations
– Genie parsers
– pyATS
– xPresso
I am always open to questions, comments, or feedback if you need help getting started!
Downloading the tools and exploring yourself is the best way to get started but I’m here to help!