In the wake of some very high profile IT security breaches and state sponsored attacks using compromised software today I wrote some infrastructure as code Ansible playbooks to create some business-ready documentation to help us understand our Cisco software version footprint against what release the vendor recommends. It is very important to run “Safe Harbor” code in the form of the Gold Star release. These releases are as close as it gets to being bug-free, secure, tested, and supported in production environments.
The ‘old-way’ involved getting the Cisco Part ID (PID) or several PIDs and looking up the recommended release on Cisco.com using an ever deepening hierarchy of platforms, operating systems, and PIDs. At scale this is like a day’s worth of work to go gather all of this information and present it in a way the business can understand.
Building on my recent success with the Serial2Info Cisco.com API as well as Ansible Facts I thought this might be another nice use-case for business-centric, non-technical (not routes, IP addresses, mac addresses, etc), extremely important and critical insight.
Use Case
Can I automatically get the PID from a host or group of hosts and provide it to the Cisco.com Software Suggestion API building business-ready reports in CSV and markdown?
Answer: Yes!
The Playbook
Again you are going to need:
* A Linux Host with SSH access to your Cisco IOS devices and HTTPS access to the Cisco.com API * Credentials for the host and for the OAuth2 API * We are not using Genie parsers here so just “base” Ansible will work
Step 1. Setup credential handling
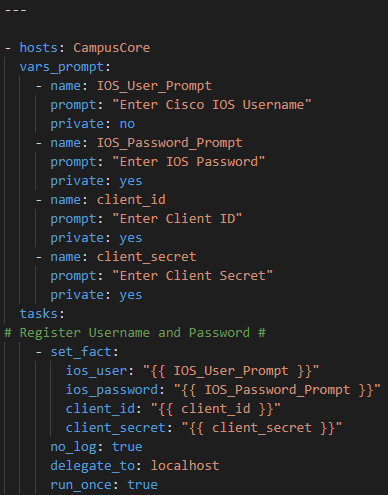
Create a playbook file called CiscoCoreRecommendedReleaseFacts.yml
Again I use prompted methodology here same as the Serial2Info API
Gather the username, enable secret, Cisco.com API ClientID, Client Secret
Step 2. Gather Ansible Facts
Using the ios_facts module gather just the hardware subset
Because we are using Ansible Facts we do not need to register anything – the JSON is stored in the Ansible magic variable ansible_facts
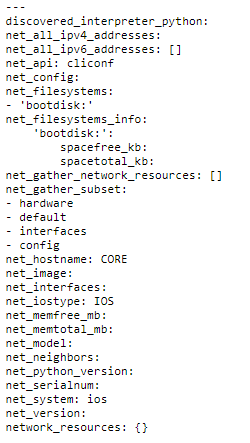
I need 2 keys from this JSON – the PID and ideally the current running version. These can be found as follows in the ansible_facts variable:
Which is accessed as ansible_facts.net_model
Which again is accessed as ansible_facts.net_version
With the information above – without going any further – I could already build a nice report about what platforms and running versions there are!
But let’s go a step further and find out what Cisco recommends I should be running!
Step 2. Get your OAuth2 token
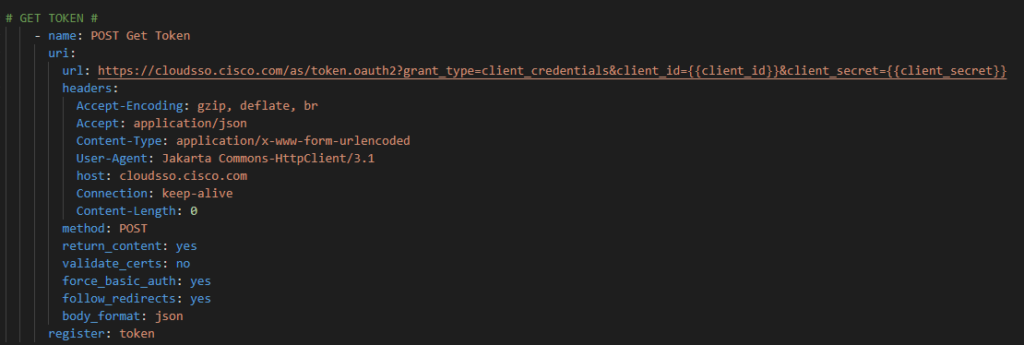
First, using the Ansible URI module
We need to get our token using the registered prompted credentials.
The API requires the following headers and body formatting; register the response as a variable (token):
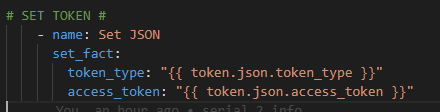
We have to break apart the RAW JSON token to pass it to the ultimate Recommended Release API:
Now we are ready to send PIDs to the API.
Step 3 – Send PID to Cisco.com API
Again using the URI module:
Here we pass the ansible_facts.net_model Fact to the API as an HTTP GET:
The headers and body requirements. Notice the authentication and how we pass the Bearer Token along. We also register the returned JSON:
Here is what the returned JSON looks like:
The highest level key is json or accessed via RecommendedRelease.json
There is a productlist
Which as you can see is a listas denoted by the [ ]
Inside this list is another product key with the values from the API about the product itself
A little further down we find the recommended software release
Step 4 – Transform technical documentation into business ready CSV / MD files
These JSON and YAML (I also use the | to_nice_yaml filter to create a YAML file along with the JSON file) files are create for technical purposes but we can do a bit better making the information more palatable using business formats like CSV and mark down.
It is just a matter of using Jinja2 to template the CSV and Markdown files from the structured JSON variables / key-value pairs.
Add a final task in the Ansible playbook that will loop over the CSV and MD file types using the template module to source a new .j2 file – CiscoCoreRecommendedReleaseFacts.j2 – where our logic will go to generate our artifacts.
The Jinja2 starts with an If Else EndIf statement that checks if the Ansible loop is on CSV or not. If it is it uses the CSV section of templated file format otherwise it uses markdown syntax.
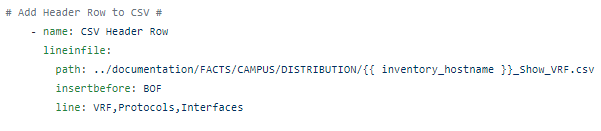
First we want to add a CSV header row
Then we need a For Loop to loop over each product in the productList
Now we add our “data line” per product in the loop using the various keys
Hostname for example uses the Ansible magic variable inventory_hostname
Then we want the Base PID. We use the Ansible default filter to set a default value in case the variable happens to be empty.
We continue accessing our keys and then we close the loop.
Now we need to create the Markdown syntax
And the same logic for the “data row” but with pipes instead of commas. Make sure to close off the If statement
Step 5 – Run playbook and check results
We run the playbook as ansible-playbook CiscoCoreRecommendedReleaseFacts.yml
Answer the prompts
Let the playbook run and check the results!
Summary
Again with a few free, simple tools like Ansible and the Cisco.com API we can, at scale gather and report on the current running version and the vendor recommended version quickly and easily and fully automatically!
Now go and start protecting your enterprise network armed with these facts!
Layer 9 issues – finance – are often some of the most challenging a network engineer faces. Contract management can be particularly difficult in any scale organization especially if you are not “sole source” purchasing. Serial numbers and contracts are also not typically things the “network people” want to deal with but when that P1 hits and you try to open a SEV 1 TAC CASE – only to find out you are not under contract – I’ve been in less terrifying car accidents than this nightmare scenario.
I have good news ! Using a mix of automation and developer-like tools the network engineer can now create a real source of truth that, along with routes and MAC address-tables and other technical information, can include inventory and contractual business documentation from stateful, truthful, real-time, facts from Cisco.
Ok so let’s get into it!
As a rough outline for our logic here is the use case:
Can I automatically gather the serial numbers from Cisco device hostnames and then provide them to Cisco and get my contractual state for each part on each device?
Answer: YES !
What you will need:
* Linux host with Ansible, Genie parser * Linux host requires both SSH access to the Cisco host and Internet Access to the OAuth2 and Cisco.com API HTTPS URLs * Cisco SmartNet Total Care – I have written up instructions in this repo under the “OnBoarding Process” section
The Playbook
Step 1 – We will need to get the serial number for every part for a given hostname. For this we will use the standard show inventory command for IOS using the Ansible ios_commandmodule. I will be using prompted methods for demonstration purposes or for on-demand multi-user (each with their own accounts) runtime, but we could easily Ansible Vault these credentials for fully hands-free run time or to containerize this playbook. I am also targeting a specific host – the Core – but I could easily change this to be every IOS device in the enterprise. This playbook is called CiscoCoreSerial2InfoFacts.yml
First prompt for username, enable secret, Cisco Customer ID, Cisco Customer Secret and register these variables:
Then run the ios_commandshow inventory and register the results in a variable.
Step 2 – Parse the raw output from the IOS command
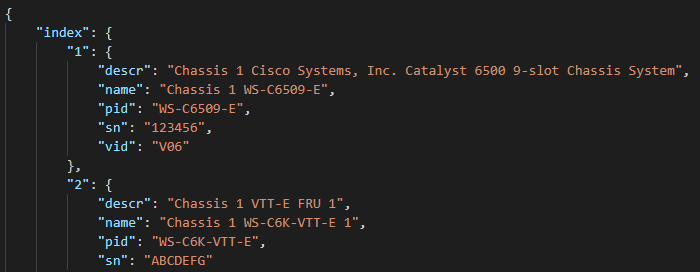
Next, we use Genie to parse the raw results and register a new variable with the structured JSON. Genie requires, for show inventory, the command, the operating system, and the platform (in this case a Cisco 6500)
And here is what that structured JSON looks like:
So now we have a nice list of each part and their serial number we can feed the Cisco.com API to get back our contract information.
Step 3 – Get an OAuth 2 token from Cisco web services.
Cisco.com APIs use OAuth2 for authentication meaning you can not go directly against the API with a username and password. First you must retrieve a Bearer Token and then use that limited time token within it’s lifetime against the ultimate API.
Using the Ansible URI module go get a token and register the results as a variable. Provide the Customer ID and Client secret prompts to the API for authentication. This is an HTTP POST method.
With the new raw token setup the token type and access token from the raw response
Step 4 – Provide token to the Serial2Contract Cisco API to get back contractual information for each serial number.
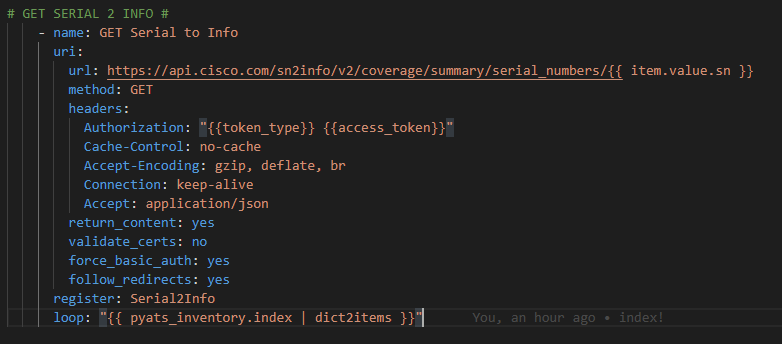
In this step we are going to use an Ansible loop to loop over the Genie parsed structured JSON from the show inventory command providing the sn key for each item in the list. We need to use the Python | dict2items Ansible filter to transform the dictionary into a list we can iterate over.
The loop is written as
loop: “{{ pyats_inventory.index| dict2items }}”
And each serial number is referenced in the URL each iteration through the loop:
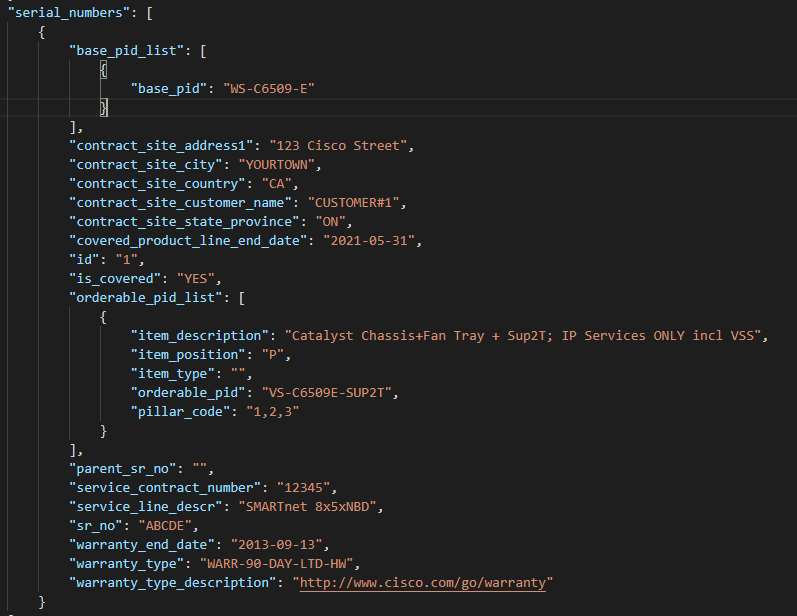
We register the returned structured JSON from the API as Serial2Info which looks like this:
So now I have the JSON – let’s make it a business ready artifact – a CSV file / spreadsheet and a markdown file – using Jinja2
Step 5 – Using Jinja2 lets template the structured JSON into a CSV file for the business.
Create a matching Jinja2 template called CiscoCoreSerial2InfoFacts.j2 and add a task to Ansible that uses the template module to build both a CSV file and a markdown file from the JSON.
In the Jinja2 file we need a section for CSV (if item = “csv”) and a section for markdown (else) based on their respective syntax. Then we need to loop over each of the responses.
result inSerial2Info[‘results’] is the loop used. I also add a default value using a filter | default (‘N/A’) in case the value is not defined. SFPs for example do not have all of the fields that a supervisor module has so to be safe it’s best to build in a default value for each variable.
The final Jinja2 looks something like this:
Which results in a CSV and Markdown file with a row for every serial number and their contractual facts from the API.
Summary
Large scale inventory and contract information can easily be automated into CSV spreadsheets that the business can easily consume. Ansible, Genie, Cisco.com APIs, Jinja2 templating and a little bit a logic come together into an automation pipeline that ensures contractual compliance and inventory fidelity at scale!
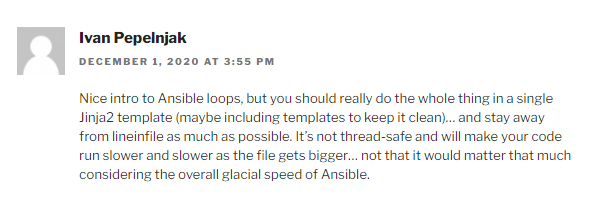
I wrote a post about untangling dynamic nested loops in Ansible.
In another recent post about trying to improve Ansible performance I didn’t get very far – but this could be the silver bullet I’ve been looking for to both optimize and make my Fact / Genie parsing playbooks more elegant code but also to bring my run times down so I can bring this from the lab to production.
Jinja2 Templates
One of the reasons why I perked up at Ivan’s generous suggestion is because I am a big fan and heavy user of Jinja2 templates already to generate intended configurations (Cisco IOS, NXOS configurations; JSON files for API POST) and documentation (intended configs in CSV, markdown, and HTML) – but I had just never thought of implementing them to create my documentation from received data!
My old way involved taking the structured JSON and using lineinfile or copy to create my output files. This was slow. Very slow.
Copy method:
Line In File method:
How to refactor this?
So I already have everything I need content wise – a header row and the data rows – I just need to move this into Jinja2 format. As it turns out there are some added benefits beyond just performance that I will highlight.
My quick use case was my CiscoNXOSFacts.yml playbook against 2 7Ks just gathering facts (nxos_facts) and transforming the structured JSON into business documentation.
– Create Nice JSON file from facts – Ansible | to_nice_json filter – Create Nice YAML file from facts – Ansible | to_nice_yaml filter – Create CSV file from facts – Create markdown file from facts – Generate HTML from markdown
So the first refactoring is the actual task from using copy or lineinfile to using template. Template needs a source (a new Jinja2 template file we will create in our next step).
Template also needs a destination. Here is where we can use the programmatic capabilities of Jinaj2 to simplify, optimize, and massively improve performance by setting up a simple loop and create both files. Wait files plural? Yes. My old way involved creating 2 separate files in 2 separate tasks. Now that I am using Jinja I can use variables – one item being “csv” and the other item being “md” – and pass them to the template for processing.
So create a Jinja2 template file called CiscoNXOSFactsTemplate.j2 to create your CSV and Markdown files.
Before I show the template I want to highlight another massive improvement to using Jinja2 – Jinaj2 is able to iterate naturally over dictionaries while my previous method had to pass the structured JSON through the | dict2items Ansible filter (against adding processing time). This simplifies the code quite a bit.
In the template we will test if the loop is on csv or md and create either a csv or md formatted output file.
Else if item is md create the markdown file format
One last and very important comment and benefit of Jinja2 is that I do not need to use Regular Expressions “as much” to clean up the JSON. | dict2items leaves a lot of garbage JSON characters behind which I had to previously use processor intensive RegEx tasks to clean up. Now Jinja2 does this cleanup and conversion from RAW to Nice JSON for me!
Results
I have only tested 1 playbook but I am very excited about this new refactored code !
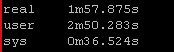
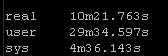
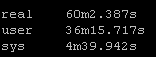
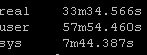
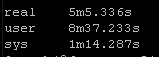
Again this playbook “only” touches 2 physical devices but I have playbooks that potentially could be gathering facts and generating artifacts for hundreds of devices. But the results are pretty clear particularly the system time
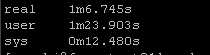
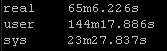
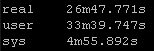
Old way:
New way:
So roughly half the “real” time but look at the system time – from 36 seconds down a third to 12 seconds! WOW!
Thanks again!
A big thanks to Ivan for taking the time to comment and point me in a better direction. You may not know this but when I started my automation journey one of my resources along with several books, Cisco DevNet, trial and error, was my IPSpace.net subscription. If you are looking for a very affordable and very comprehensive library of networking and automation knowledge this is a good place to start.
I’ve done many great things with Ansible but occasionally I come across a logical problem that may stretch the tool past it’s limitations. If you have been following the site I am on a big facts discovery and automated documentation movement right now using Ansible Facts and Genie parsers.
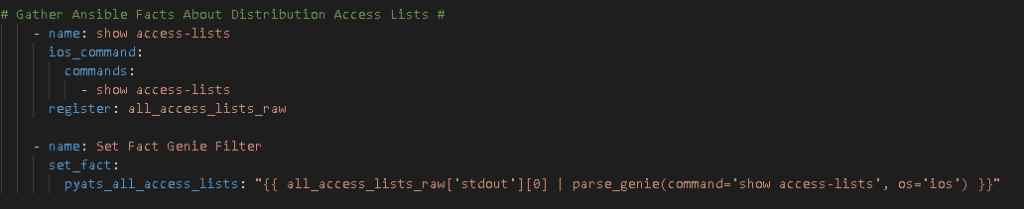
The latest parser I am trying to convert to documentation is the show access-lists command.
So we use the Ansible ios_command module and issue the command then parse the response. This is a playbook called CiscoACLFacts.yml
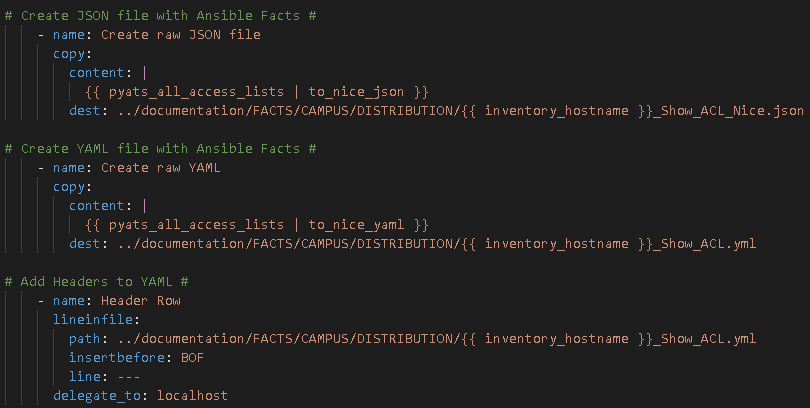
I always start with creating Nice JSON and Nice YAML from the structured JSON returned by the parsed command:
Then I examine the Nice JSON to identify “how” I can parse the parsed data into business documentation in the form of CSV, markdown, and HTML files.
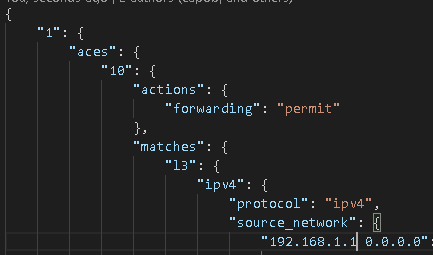
And I have my CLI command converted into amazing structured human or machine readable JSON:
So here is where the logical challenge comes into play with Ansible.
As you know an Access Control List (ACL) is a list (hint: it’s right in the name) of Access Control Entries (ACEs) which are also a list. Both the ACL and the ACE are variable – they could be almost anything – and I need 2 loops: an outer loop to iterate over the ACLs (shown above is the “1”) and an inner loop to iterate over the ACEs (shown above as the “10”).
So I brush up on my Ansible loops. Looks like I need with_nested.
Problem: Ansible does not support dynamic loops as you would expect. Here is what I “wanted to do” and tried for a while before I figured out it wasn’t supported:
Before I get into the loops a couple things to point out to anyone new to infrastructure to code or JSON specifically. The Genie parsed return data is not a list by default. Meaning it cannot be iterated over with a loop. We have to filter this from a dictionary – as indicated in JSON by the { } delimiters – into a list (which would be indicated by [ ] delimiters in the JSON if it was a list we could iterate over) – before we can loop over it.
| dict2items is this filter.
The loops:
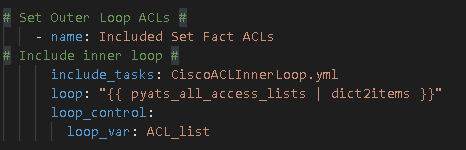
You can define the outer loop key using loop_var as part of loop_control along with include to build a dynamic outer / inner loop connection.
In order to create my CSV file:
1 – Delete the file outside the loops / last Ansible task before entering the loops
2 – * Important new step here *
We need to perform the outer loop, register the key for this outloop, and then include a separate YAML file that includes the inner loop task
3 – * Another important new step here *
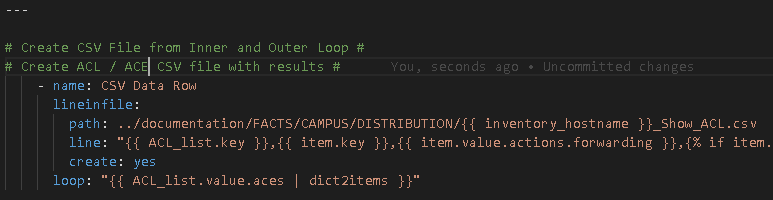
Create the referenced file CiscoACLInnerLoop.yml with the inner loop task, in this case, the task to add the rows of data to the CSV file
Things to identify in the above task:
The loop – it is using the outer loop (the loop_var) ACL_list as the primary key then we turn the .value.aces dictionary into another list with | dict2items giving us the inner list we can iterate over.
Important – the inner loop is what Ansible will reference from this point forward meaning item. now references the inner items. In order to reference the outer key you need to reference the loop_var again as seen on the line: “{{ ACL_list.key }},{{ item.key}}
This gives us the ACL then the individual ACE per row in the CSV file! Mixing the outer and inner loops!
Recommendation – you will notice the start of an {% if %} {% else %} {% endif %} statement – because almost everything in an ACL and ACE list is variable you should test if each item.value.X is defined first, use the value if its defined, otherwise use a hard coded value. As such:
{% if item.value.logging is defined %}
{{ item.value.logging }}
{% else %}
No Logging
{% end if %}
Next, back in the main playbook file, outside the loop, we finally add our CSV header row:
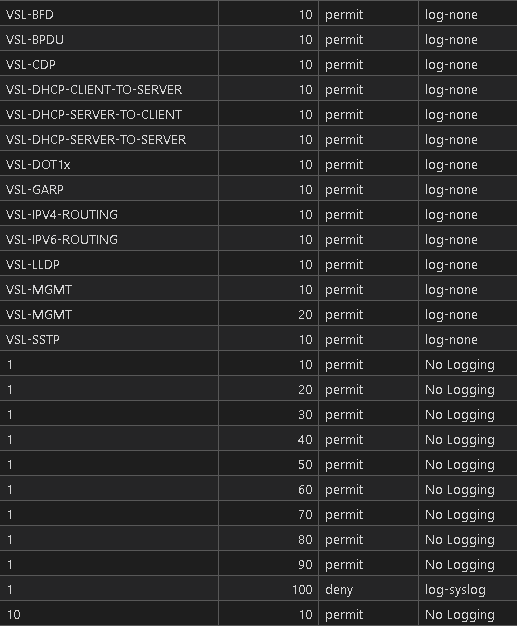
For the sake of keeping this short there is likely some Regular Expression replacements we need to make to clean up any stray JSON or to remove unnecessary characters / strings left behind but in essence we have the follow show access-lists command rendered into CSV:
Operations, management, compliance and standard, and most of all IT SECURITY is going to love this! All of this is in a central Git repository so all of these artifacts are Git-tracked / enabled. All of the CSV files are searchable, sortable, filterable, and EXCEL ready for the business!
Summary
Before you give up on any problem make sure you find and read the documentation!
I have to revisit some previous use cases and problems now with fresh eyes and new capabilities because I had given up on transforming some previous dictionaries in dictionaries because I didn’t know what I was doing!
One step closer! I hope this article helped show you how dynamic Ansible looping is done and you don’t have to fail and struggle with the concept like I did. I am out there on Twitter if you have any questions!
When I describe Ansible to people I tend to use many positive adjectives. Amazing, incredible, easy, revolutionary, powerful, and a few others. One adjective I never use, however, is fast. I would not describe Ansible as a high performance tool. Compared to manually doing the things I’ve come to automate with Ansible there is still no doubt I am saving hours if not days of effort. But now that I’m using Ansible for almost everything and at scale it would be great if I could get better performance out of the tool.
Over the years I’ve learned to run the ansible-playbook command then – and chant it like the late night informercial – “Set it and forget it!”
Its the one, sometimes painful, drawback I can find with Ansible. There has yet to be an infrastructure problem I have not been able to solve with Ansible – provided I am comfortable with waiting. “How long does this take?” change managers or operations will ask. “A while.” Is usually as optimistic as I can be.
(Note: It is a bit ironic sometimes the same crowd with complaints about how long a playbook takes to run are usually the same people who were comfortable with pre-automation manual-at-the-cli-of-every-device execution times into the days or weeks. Now anything more than a 10 minute playbook run seems like a long time. Go figure)
TL:DR
– Ansible is an amazing automation tool – Ansible is not known for its performance – Three modifications tried to make it go faster – LibSSH – Forks – Pipelines – No real improvements found with any of the above
Moving to LibSSH
The driving factor for me to bring my Ansible ecosystem into the shop and put it up on the lift to get underneath and into the mechanics of the configurations is this latest official blog post from Ansible.
This particular section of the blog post is what drives my exploration today. And yes FIPS readiness is important to me – the hook for me here is “designed to be more performant” – and yes the link they provide is great but I want to take the Pepsi Challenge myself.
Playbooks tested
I will be using the following playbooks with 2 different scale sets.
Cisco IOS Facts – Against my Lab distribution layer (4, Cisco 4500s) and my access layer (about 20 – 25 devices of various Catalyst flavours (2960, 3560, 3750, 3850, 9300)).
Cisco NXOS Facts – Same idea but against NXOS. 2 Nexus 7000 and 2 Nexus 5000.
The above playbooks use the Ansible facts modules. Let’s do some Genie Parsing of a show command as well.
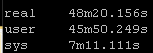
In Linux you can use the timekeyword command and prepend any command. Linux then provides three different timer – the real time, the user time, and the system time – results showing how long the command took to execute.
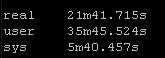
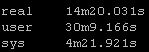
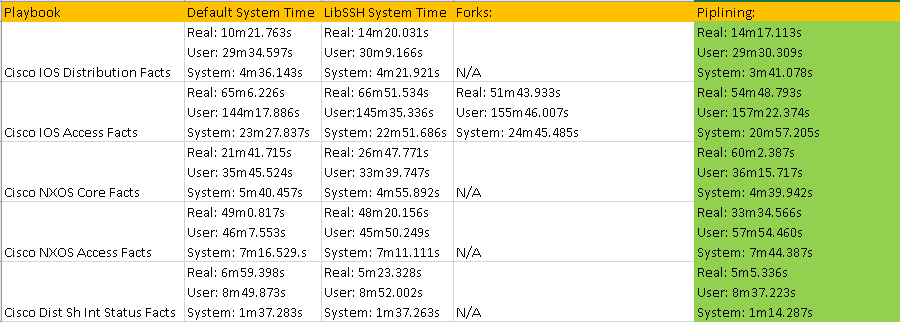
Result Set #1 – Defaults
With no changes to default Ansible here are the results. I will be standardizing on the sys results because of the input and other factors the real times and users times may have deviations:
Install LibSSH and modify Ansible
First step is to pip install the Ansible library we need:
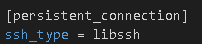
Then we to update our persistent connections:
Refresh your Git repo and re-run the playbooks.
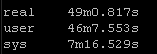
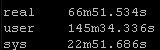
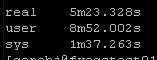
Result Set #2 – LibSSH
Forks
Ansible can be set to fork which allows multiple independent remote connections simultaneously.
Forks are intelligent and will only fork for the maximum number of remote targets. So I will set my forks in ansible.cfg to 50.
Now I don’t think this will help playbooks with under 5 targets because I believe Ansible defaults to 5 forks but maybe this will improve the Access Layer Facts which targets around 25 hosts. So lets just test against that one playbook.
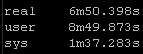
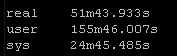
Results Set #3 – Forks
Pipelining
Enabling pipelining reduces the number of SSH operations required to execute a module on the remote server, by executing many ansible modules without actual file transfer. According to the documentation this can result in a very significant performance improvement when enabled.
Add pipelining=true to the SSH connection section in ansible.cfg:
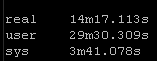
Result Set #4 – Pipelining
Summary
I didn’t have much success making Ansible go any faster either with the new LibSSH library, with forking, or with pipelining. I absolutely love ansible but the above times are from my small scale lab – imagine these run times in production at 5-10x the scale.
Have you found a way to make Ansible go faster that I’ve overlooked? Drop my a line!
Sean also jumped in to mention the driver for LibSSH was FIPS not performance and there are some performance improvements coming soon! Great!
This wasn’t for performance gain but for FIPS readiness. However there is some possible updates coming soon for network performance. The two are not related though.
And he’s right! I can’t stop making new GitHub repositories with Genie parsed show commands to documentation! Like show ip interface brief as seen above!
Imagine if you could transform that unstructured Cisco show command screen output into something more useful than just CLI output.
What if there was a way to transform an SSH CLI show command’s response into a RESTful API-like HTTP GET request response in RESTful API-like structured JSON?
Sounds amazing right? Well with Genie this is totally possible. I mentioned the CTAS Genie / pyATS / xPresso solution in My Toolkit post. I also suggested that gathering facts with Ansible is the best place to start with network automation and infrastructure as code.
But the Ansible facts, while impressive, rich, plentiful, and extremely useful, they do not necessarily contain all of the state information that IOS / NXOS CLI show commands provide. Some information, such as CDP neighbors, interfaces, IP addresses, is available with only the ios_facts / nxos_facts modules but for things like the configured Virtual Route Forwarders (vrf) on a router, the IP Address Resolution Protocol (ARP) tables, or the OSPF routing tables you are stuck with crappy old Cisco CLI output right?
Wrong. You now have a magical Genie on your side who is here to grant all your state capture and transformation wishes! And you get more than 3!
TL;DR
– The historic restrictions of using Cisco IOS / NXOS show commands as CLI-only, raw screen / putty logged output, have been lifted. – Genie parsers provide REST API HTTP GET-like responses to common CLI show commands. – Ansible integrated allowing for running and parsing show commands at scale. – I like to create RAW JSON, Nice JSON, Nice YAML, CSV, Markdown, and interactive HTML mind maps from any JSON I can get my hands on. Now I can do it with Cisco show commands! – Fill the gaps from what is missing from base Ansible facts. – Build a powerful, dynamic, state aware documentation set for every device in your network from every day show commands. – Not as difficult as you might think. – Another modern network automation, infrastructure as code, tool network engineers should include in their skillset. – The best development team in the business. The Genie / pyATS / xPresso developers have personally helped me out. Find them on Cisco WebEx Teams for often real-time responses.
What is Genie?
Genie is a parser that automatically converts Cisco IOS / NXOS command output into structured JSON. This structured JSON allows developers to then work more programmatically with the output from important, but otherwise useless, show command output.
For example I am using Genie to parse some key show commands and create a dynamic automated library of documentation in different formats.
You can also go a step further with pyATS and write boolean tests (true / false) in Python using the Genie parsed data as your source of test data. The show ip ospf neighbor command, for example, can be executed, parsed with Genie, and then tested with pyATS! All of this can then be wrapped in business logic, scheduling, and protected with RBAC in xPresso.
Amazing but I am not made of money – how much does all this capability cost?
It is all free.
How do I integrate it with Ansible?
The amazing Ansible integration that I am using is thanks to Clay Curtis and his incredible contributions. Thanks to Clay there are two installation steps on top of the standard Ansible installation and an open Python filter plugin – then you are ready to go.
It’s easier to just demonstrate how the Parser can be used with Ansible. Some prerequisites:
– Linux host – pip install ansible – pip install genie – ansible-galaxy install clay584.parse_genie – SSH access to network devices from this host – Credentials for the device (prompted) – The parse_genie Python filter_plugin – Make sure your ansible.cfg specifies the location of the parse_genie file in filter_plugins.
[defaults] filter_plugins=../filter_plugins
Example: show vrf
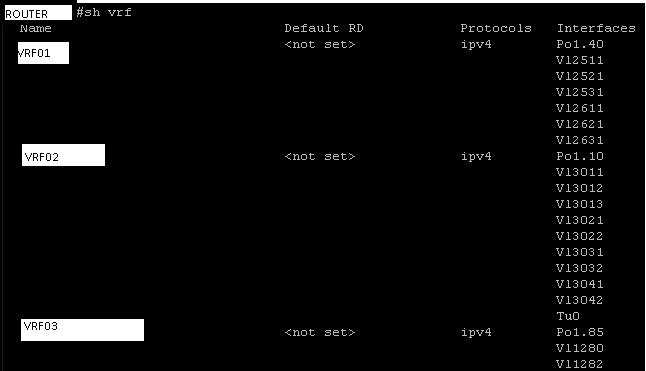
Recall what a show vrf looks like at the CLI:
This could spawn for pages depending on how many VRFs are hosted on the router. Also – how do you work with this output? Log to a putty file and inspect in notepad offline? Not very user friendly.
Let’s Genie parse that same command and see what the output looks like as structured JSON and take the Pepsi Challenge against the CLI.
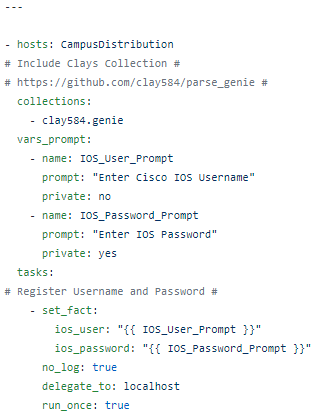
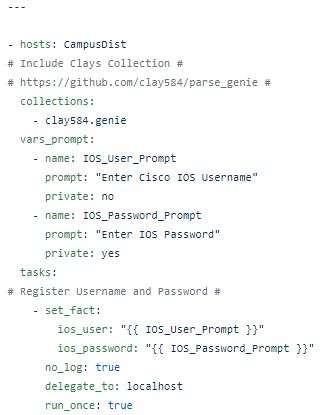
In a playbook called CiscoVRFFacts.yml I first scope the playbook (CampusDistribution), then prompt for username and password. Note the collection includes Clay’s clay584.genie collection.
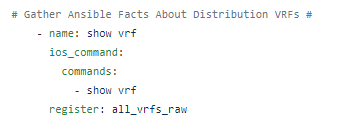
Next I run my standard Cisco show command with the ios_command module and register the response (which is RAW unparsed IOS config at this point) Nothing fancy here.
The next step is where we use the filter_plug in to parse the registered raw response and register a new variable that holds the parsed output. Again – this is not very complicated once you understand the syntax.
Note the parsed command is the same as the original command, in this case show vrf, and we have to specify the operating system (Cisco IOS).
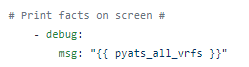
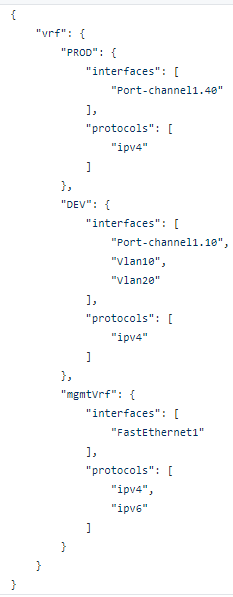
You can optionally print these parsed facts, the nice JSON, to the screen.
Resulting in something like this:
We can save this output to a variety of files and manipulate the output in a variety of ways previously unavailable to us with raw standard CLI IOS output.
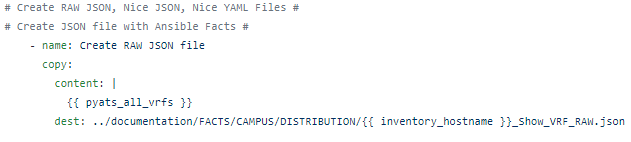
For starters lets put the RAW JSON response into a JSON file with the Ansible copy module.
Which is good for forensics, audits, security purposes, or for downstream systems that intake raw JSON, but it’s not very human readable.
Add the Ansible filter| to_nice_json to get the output to look like the output that is printed to the screen.
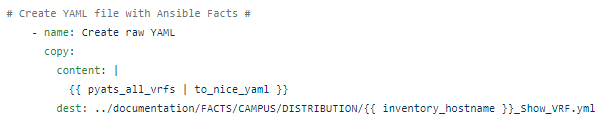
Now this is up for debate but personally I prefer and find YAML even more human-readable than JSON. Let’s make a YAML file with the | to_nice_yaml filter.
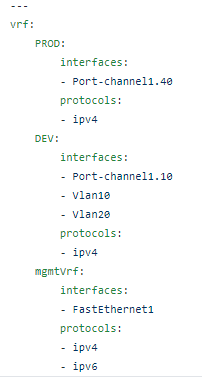
As a reminder this is what the show vrf command looks like at the CLI:
Now, in YAML:
Incredible!
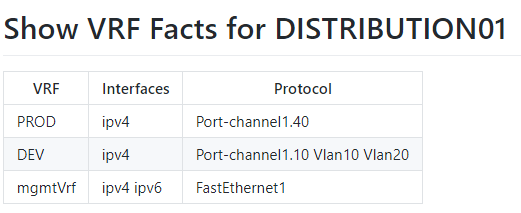
Going a step further we can try to manipulate the output for business suitable reports in CSV, markdown, and HTML files.
Using yet another Ansible filter, the dict2items, which as the name implies transforms a dictionary to a list of items, we can loop over the original variable {{ pyats_all_vrfs.vrfs }} key and create our CSV / markdown.
(There are some Regular Expression (RegEx) steps that clean up the JSON a bit omitted for brevity)
Add a header row.
And now you have a CSV file!
Similar steps can create a markdown.
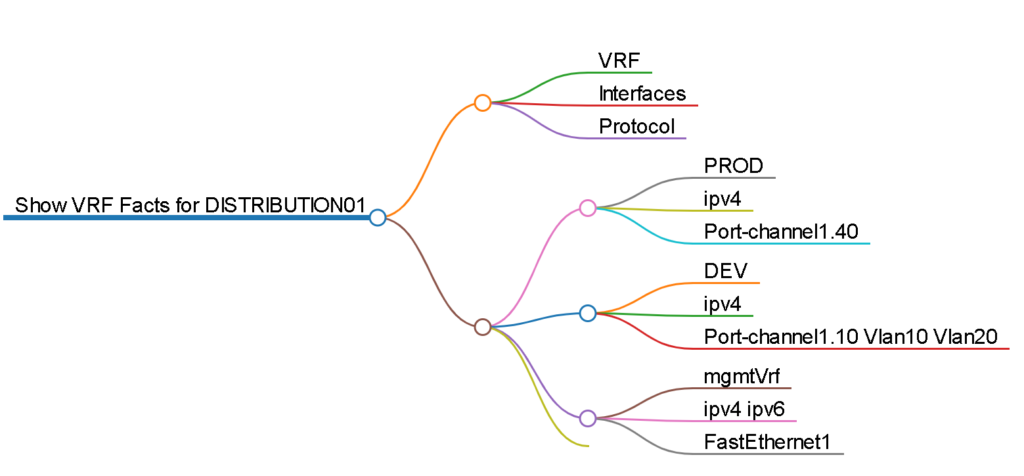
And then an HTML mind map can be generated.
Look at all the business and operational value we’ve squeezed out of a simple show vrf command!
All of this code is available on Automate Your Network’s GitHub.
Start with the CLI show ip arp command output, which to be fair isn’t the worst CLI output around, which provides the ARP table for the Global Routing Table.
With more or less the same steps transform this into the same reports.
Setup the playbook:
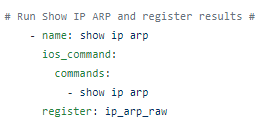
Run the show ip arp command:
Parse it:
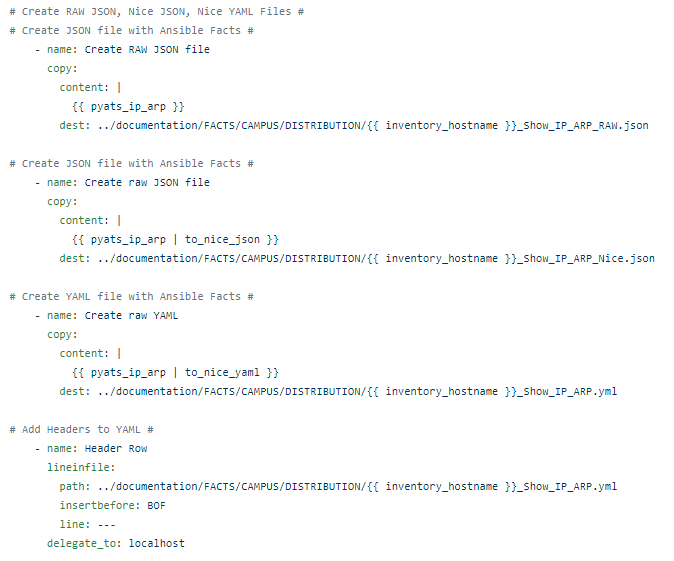
Create your 3 base RAW JSON / Nice JSON / Nice YAML files:
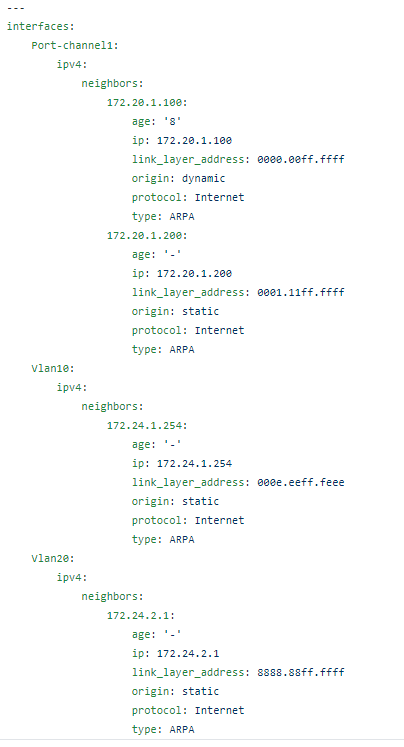
Check out this nice output!
Now anybody, CCNA level or not, can read the ordered structured list and see that VLAN20 has 1 neighbor with an IP of 172.24.2.1, the age, and the MAC address.
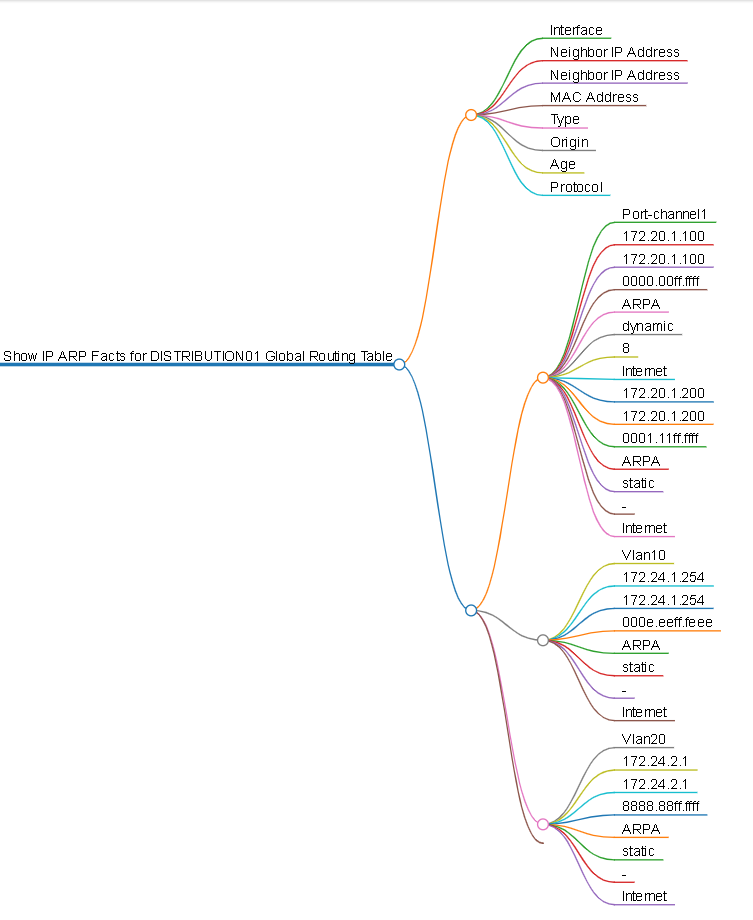
Similar steps to transform the output create the CSV / markdown / mind maps:
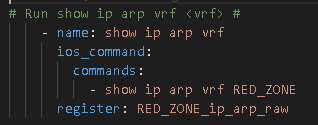
The exact same steps can be performs by simply adding show ip arp vrf <vrf name> with the same output as the Global Routing Table.
As a development aside I had big plans for show ip arp vrf {{ vrf }} to be a dynamic and automatically loop over all of the VRFs present on the route. I got pretty far but the parser itself hung me up.
Meaning I had a previous loop over the Genie parsed show vrf command which provided me the VRF name to feed the show ip arp vrf command. This all worked out and I could get the raw unparsed list like this:
ios_command: commands: – show ip arp vrf “{{ item.key }}” loop: “{{ pyats_all_vrfs.vrf | dict2items }}”
But when it came time to parse this the following didn’t work.
| parse_genie(command=’show ip arp vrf {{ item.key }}’, os=’ios’)
I think because the parser is treating {{ item.key }} as raw text / the raw command and is not aware of the outer loop and to treat it like a variable. For the same reason I couldn’t write it to prompt for a VRF name. So, yes, I found one edge case drawback where I have to hardcode the VRF. Leave me a note if you see a way around this.
Summary
Genie parsers allow network engineers and operators to transform simple Cisco show commands into REST API-like requests with corresponding structured JSON response from the switch. This all magically happens behind the scenes allowing developers to actually make use of the show command output.
The days of setting up your Putty session to log your console to text files for offline analysis of raw standard output are finally over. Now you can work with JSON which in turn can be transformed into YAML, CSV, markdown, and HTML easily.
Along with Ansible facts, Genie parsed state data can solve the lifelong challenge of creating and maintaining good documentation.
Bonus code – show etherchannel summary
I couldn’t help myself and wrote another GitHub repository after finishing the blog. That’s how much I love Genie and how quick and easy it is!
“We become what we behold. We shape our tools, and thereafter our tools shape us.” ― Marshall McLuhan
My first attempt at network automation I used the tools that I had used to manage infrastructure with for the past 20+ years. A file editor (notepad) and a file transfer program (WinSCP) on my Windows 10 machine and a Linux (CentOS (at the office) / Ubuntu (at home)) machine. Ansible was the first new tool introduced to me and every other tool here has followed to either support my Ansible development or I was led down the path to discovery because of Ansible. So – installed Ansible on the Linux environment at the office and made sure it had SSH connectivity to my in-band management network.
Ready to go! I had everything I needed to write YAML files and make my playbooks, group / host variable files, and inventory file. I could either write these in Notepad in Windows and transfer them to Linux or just “vi” them directly on Linux. All set right?
As a beginner trying to orchestrate a series of serially executed commands in Ansible playbook tasks I was suffering from a mix of ignorance and arrogance. I didn’t know what I didn’t know. And while yes, my playbook would eventually go onto be successful and make a large scale, complex, change across multiple devices without causing an outage of any kind, the process was brutal. Back and forth trial and error with all of these, what turned out to be, unnecessary steps of trying to track my latest version of working code across my development environments.
Shameful filenames like “John_Working_Code_v2_latest_new02.yml” were sprawling out of control and I was starting to feel like a “The Price is Right” contestant where they guess the value of 5 items, pull a lever to see how many they got right, then run back and guess again and try to figure out which ones were correct, then run back and pull the lever again.
Eventually I got all 5 items priced correctly but it was a lot of panic-driven, chaotic, running around, as it turns out, for no reason.
Was there a better way? Surely this isn’t what people mean when they say DevOps or infrastructure as code or network automation. Why would anyone do it this way? It doesn’t scale. It took weeks longer than had I just logged into each router at the CLI and configured the device manually by hand.
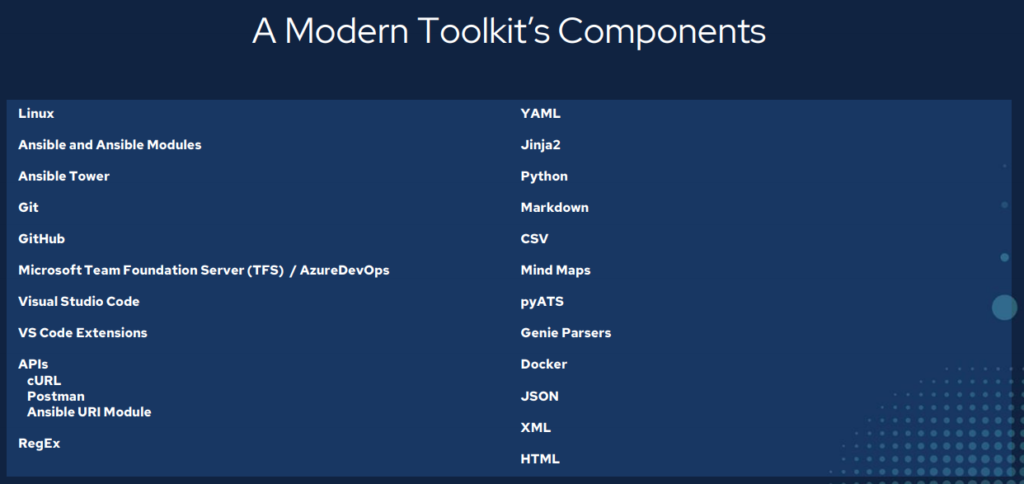
Ansible wasn’t that hard – but the tools I was using were simply wrong. Enter the modern toolkit.
TL:DR
– This toolkit took about three years to put together through a lot of hard work and discovery. – Tools make all the difference. – You need an Integrated Development Environment (IDE). – Version and source control are good things. They are not just middle management talk. – Network automation means treating infrastructure as code. – You have crossed over from IT into Development; act accordingly. – Use software development tools to solve software development problems. – Git. Git. Git. Git. Git. Git. – Powerful stuff. – Leads to Continuous Integration / Continuous Delivery (CI/CD) in the long run. – Both for configuration management as well as state capture, validation, and testing.
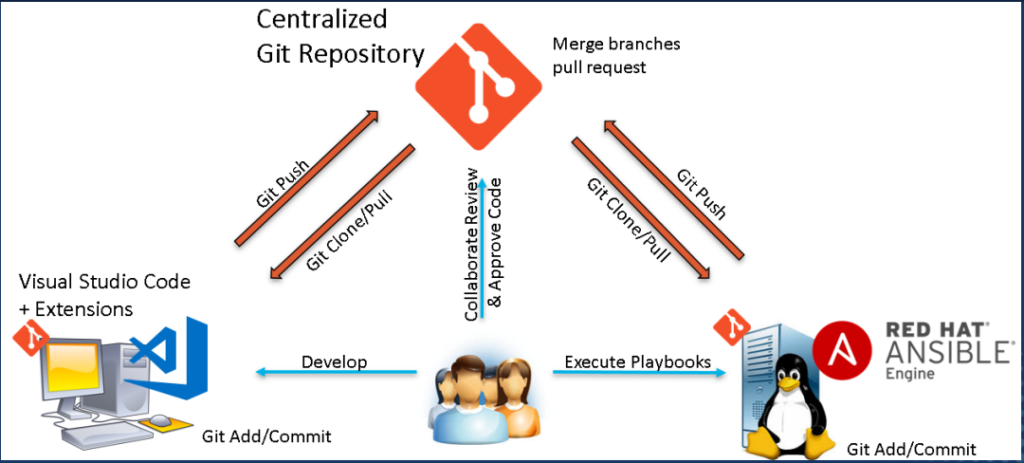
Version / Source Control – Git
I start with Git because in order of software installation Git should come first. You want to build up a development environment in order to work with infrastructure as code and you want to have both version (current, working, code; previous working code; testing new things without affecting old working things) and source (source of truth, which copy is the master copy / primary copy / main copy, allow for distributed development) controls (like RBAC but over your code base). For Windows you need to download and install Git (first, before your IDE so Git can be integrated when you install your IDE). But for Linux Git comes pre-installed as a standard.
Git is the actual software that does the version and source control. Git creates a hidden .git folder that tracks changes inside that Git-enabled folder. Git has commands used to work with code.
GitHub is an online Git repository. The largest collection of code in the universe GitHub provides a free place to store Git repositories (the folder with the .git subfolder tracking all artifacts within the parent folder). GitHub, or other Git hosting repository sites or services, provides the source control over your infrastructure as code.
Git is used to clone Git repositories (GitHub or other Git repository hosting site) locally, that is take a full copy of the remote repository locally, where developers can make changes and then push those changes back into the remote repository.
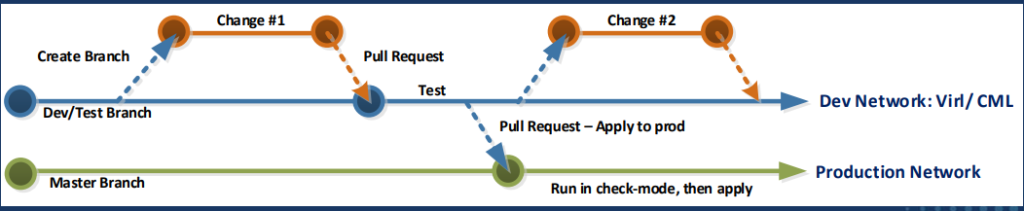
Branching
Git uses branching as it’s version control system. A main branch (previously and sometimes still referred to as master) serves as the known-good, stable, current, source of truth, intent; the master copy of a key for example.
A branch, another full copy of the code with a different identifier from main/master, can be created for development purposes. Bug fixes, feature releases, scaling, or routine changes can be done within a branch, protecting the main branch, and once tested and QA has been performed, the branch is merged through a mechanism known as a pull request, back into main, updating main’s artifacts accordingly.
It might not seem obvious at first but in larger distributed development environments the pull request system allows for cross-team orchestration and collaboration. Pull requests can require approvals and reviews and can then also be used to trigger software builds and releases. The ever evolving history of a piece of infrastructure is completely documented and tracked in the pull request history handling the entire lifecycle of any given product, platform, or host.
I love VS Code. I really do. After Git is installed download and install VS Code. VS Code is where you will be writing all of your code and reviewing the artifacts your code generates. It is fully Git integrated and aware and things like Git clone, Git add, Git commit, and Git push are all simply point-and-click operations. Split-screen editing, syntax checking, and a vast library of extensions make VS Code my number one pick for an IDE.
VS Code Extensions
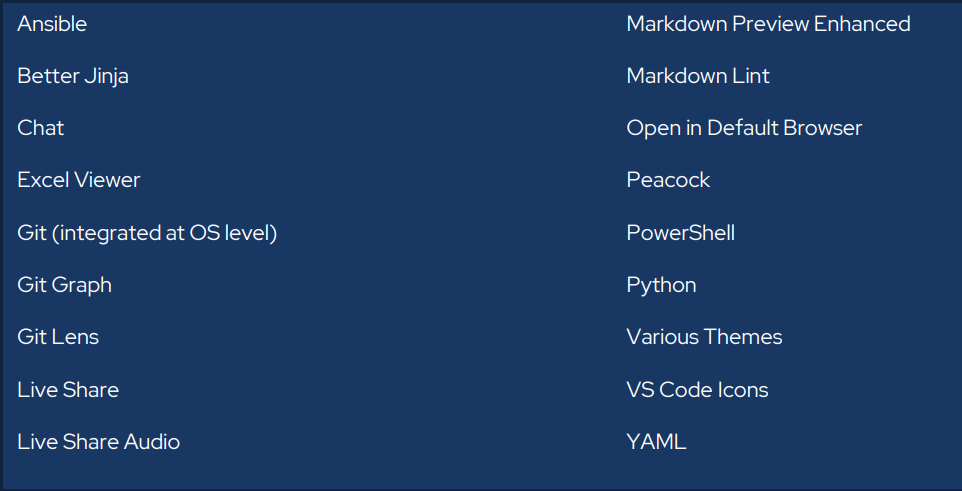
Extensions are plug-ins you can install to further enhance VS Code’s already awesome capabilities. There are thousands of extensions available out there. Here is my VS Code extension list that I find helps enhance my infrastructure as code development experience.
Formerly Microsoft Team Foundation Server (TFS), AzureDevOps provides development services for distributed development teams in the form of work boards (KANBAN; other Agile systems; waterfall), Git repositories, software builds, tests, and software releases allowing for full CI/CD DevOps.
ADO has the advantage, for me, as being an on-prem / private cloud solution with full enterprise controls (RBAC; AD integration) and feature sets.
Git repositories can transition to SSH key authentication. Docker container images can be build and deployed based on Git triggers and actions which build and deploy Ansible playbooks automatically.
Rich history, version and source controls, and an amazing collaboration space – particularly around Git Pull Requests – which fully enable and charge up infrastructure as code development. Adapt and adopt Agile practices to infrastructure teams.
Docker Integration
Moving towards infrastructure as code and full CI/CD in AzureDevOps Docker has become a very important tool and a key component of my success in DevOps. A Docker container image can be thought of as an immutable CD-ROM/DVD-like ISO (hence the “image” part) which can run, self-contained and without the need for a full blown hypervisor like VMWare or Hyper-V, an operating system and software inside of it. Docker images can be interactive and you can “log into” / shell into them, but any changes made inside this session are discarded when the session ends. Ansible and pyATS can both be “containerized” and run inside Docker container images.
Why is this important?
It allows me to setup a software build (create a Docker container image based on a specified Dockerfile) and software release in AzureDevOps CI/CD pipeline. Now any Ansible playbook or pyATS test I previously scheduled with a human operator executing the automation to fully automated and human-independent CI/CD that is trigger based on Git actions like Pull Requests.
A quick approach to Docker:
– Make it work at the CLI. – Wrap this / convert this to Ansible playbook. – Wrap the Ansible playbook in Docker. – Build and release Docker image based on Git actions that trigger the CI/CD.
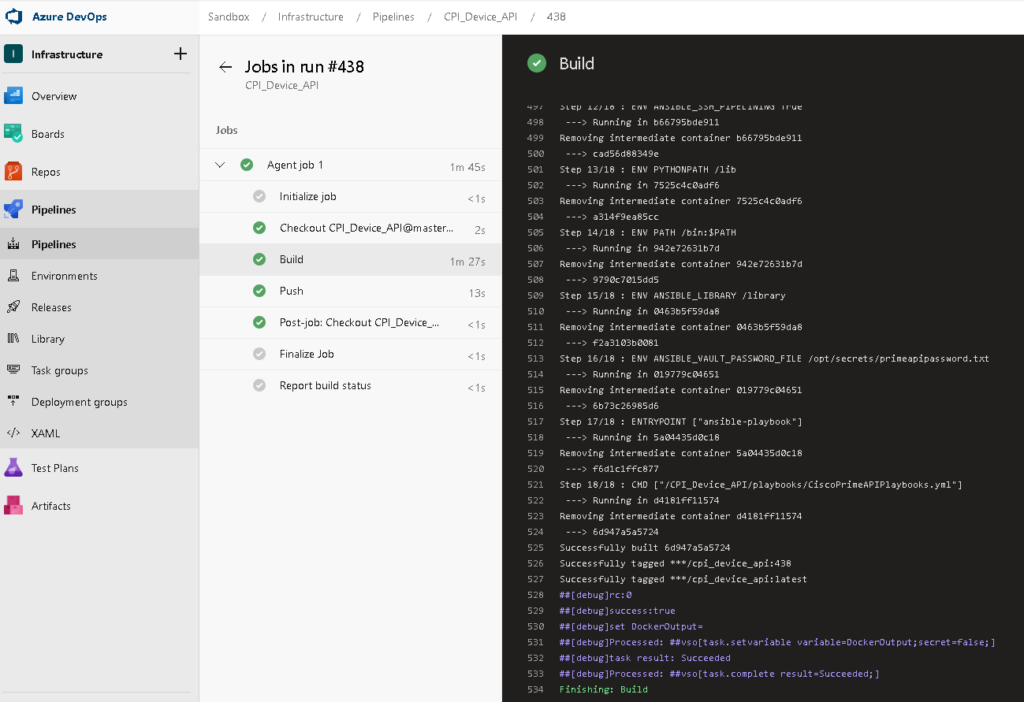
A sample infrastructure as code build:
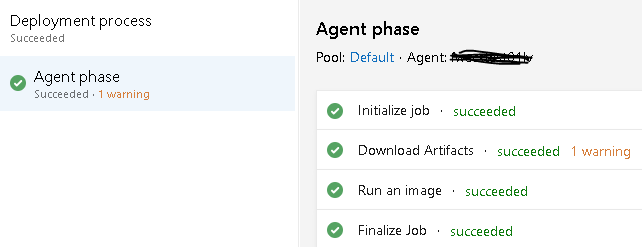
And the matching release:
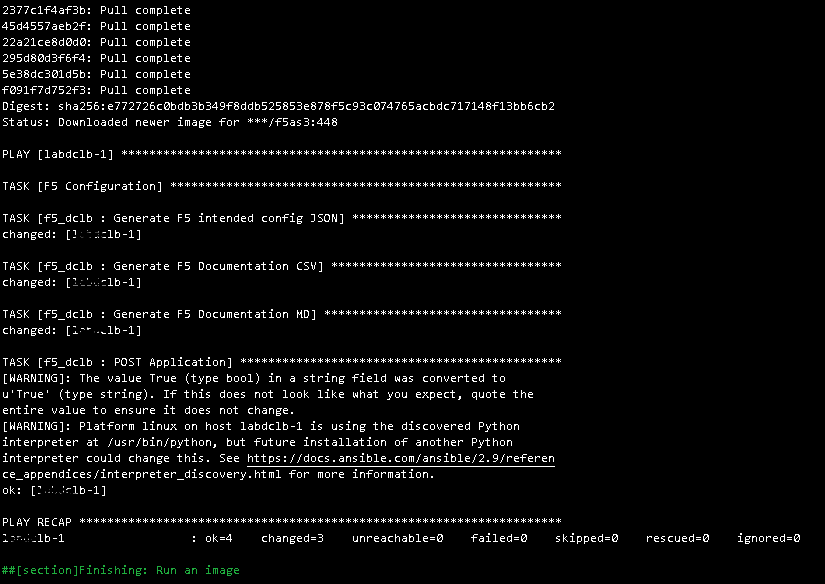
With detailed logs showing the Ansible playbook and Docker status.
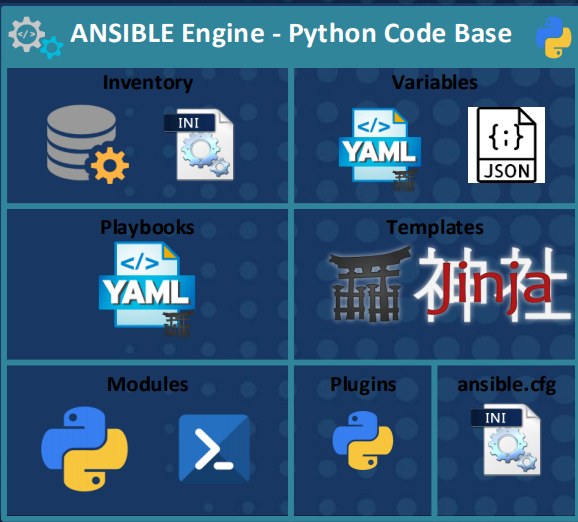
Automation Tool – Ansible
After discovering Ansible in April of 2017 my entire approach to solving infrastructure problems changed. Now I work with an automate-first principal and nearly every solution I’ve developed in the past three years has been an Ansible playbook of some kind. It really has been a one-size-fits-all tool for me. Cisco, Microsoft, Linux, VMWare, Azure, anything with a RESTful API; Ansible has done it all for me.
My key points about Ansible:
– Simple, powerful, agentless. – No previous coding skills required. This is not like learning Python from scratch. – Can be used for anything from gathering facts, tactical one-time changes at scale, or full configuration management.
The loaded term “infrastructure as code” or even “network automation” really boils down to the fact that you will be working with a few new file types to create artifacts like data models, templates and playbooks.
YAML Ain’t Markup Language (YAML)
YAML is a human readable data serialization language. In terms of Ansible both your data models (infrastructure represented as intent-based code) and playbooks (the file containing the serially executed tasks to perform) will be YAML files.
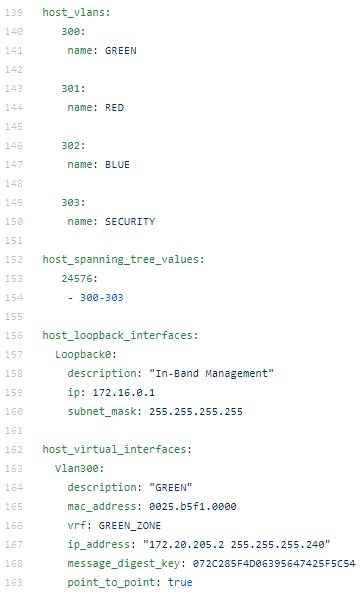
A data model for a switch might look like this:
As you can see the file format is simple, made up of lists of key-value pairs, and very human readable. This represents the intent for this particular device.
A playbook, on the other hand, might look like this:
This playbook is scoped for the CampusAccess group in the Ansible hosts inventory file. Prompts for username and password and then runs the ios_facts module printing the gathered facts on the screen.
JavaScript Object Notation (JSON)
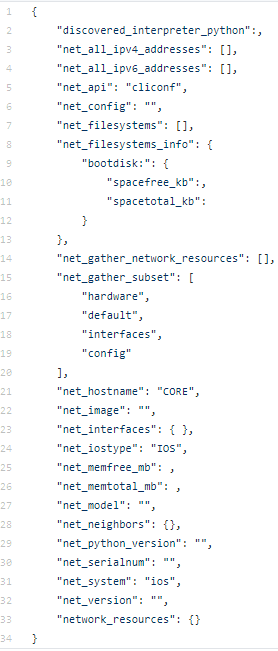
You may not need to write JSON but you should be able to consume JSON if you are working with Ansible. All Ansible facts, for example, are represented in JSON. This is much like a RESTful API that returns JSON in response to an HTTP GET. You may need to write JSON if you are POST / PUT (creating / updating) records with an API as the body of the HTTP POST / PUT will be JSON data.
Ansible facts get returned by default like this as an example of an Ansible-related JSON artifact:
Jinja2
Jinja2 is Ansible’s (and Python’s) templating language. Saved as .j2 files, a Jinja template is exactly that – a template of another file type. Configuration stanzas, JSON, YAML, CSV, markdown, HTML, plain-text; more or less anything can be templated with Jinja2.
Logic is often applied inside a Jinja2 template such as For Loops or If Else End If declarations. Jinja2 also allows for the use of variables – which reference the original data model examples.
The VLANs from the data model of example could be templated for Cisco IOS as follows:
{% for vlan in host_vlans %} vlan {{ vlan }} name {{ host_vlans[vlan].name }} {% endfor %}
Automated Documentation with Ansible filters – RAW JSON, Nice JSON, Nice YAML, CSV, Markdown, and Interactive HTML Mind Maps
Probably my favourite, and often overlooked, Ansible capability is to generate automated network and infrastructure state documentation. I do this with Ansible filters. Starting with this simple playbook:
The Ansible magic variable – ansible_facts can be transformed. To simply take the RAW JSON inside ansible_facts you can use the Ansible copymodule to copy them into a file:
But using Ansible filters – adding | and then the filter, the ugly RAW JSON can be transformed into “nice” human readable JSON:
Or even better – Nice YAML!
Which looks like this:
CSV and Markdown files can also be created using the ansible_facts JSON and another filter, JSON_Query, an SQL-like query tool used against JSON.
So we set_facts (create our own variables) from the parsed JSON:
Which we can then use to make CSV:
Or Markdown:
Mark Map
Mark Map is a nifty little program that converts any valid, well-formed Markdown file into an interactive HTML “mind map”.
You need to have node.js and npm installed in the Linux environment.
Then simply run the one line command referencing the markdown file you want to convert to a mind map.
npx markmap-cli <filename>
The output, which is fully interactive, looks like this:
Ansible Vault
A big part of moving to CI/CD and automated builds and releases from human-driven automation is securing the credentials used to authenticate against any given infrastructure. As all of the infrastructure as code is in a central Git repository you don’t want to store your credentials in plain / clear text. One approach is to use prompted mechanisms for securely handling credentials but this does not lend itself to full autonomous automation in Docker containers.
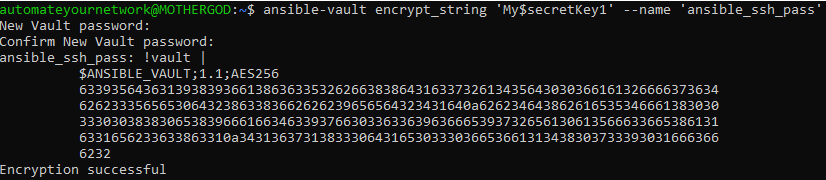
Ansible Vault provides a way to encrypt full files or in our case specific variables, such as the credentials key-value. Once vaulted the encrypted variable can then be safely stored inside the Ansible group_vars file inside the Git repo for all to see. The matching password to unlock the variable can be provided at runtime (again counter intuitive) or, and this is my approach, saved in plaintext in a file in a secure location on the Linux host.
The magic happens at Docker container image runtime where the password file is mounted as a volume into the Docker image so the Ansible playbook can dynamically unlock the credential variables at runtime. Because the lock and key are separate this is a very secure way to automate Ansible with Docker safely.
To move from something like this, that uses prompted inputs from a human operator
Vaulted variables that can be run non-interactively
Now you can replace the ansible_ssh_pass variable with the vaulted password.
To make it fully non-interactive save your Vault password ( <A Strong Encryption password here>) to a plain-text file (yes it seems counter intuitive but this is fine and safe) saved somewhere secure on the Linux host.
sudo vi /etc/secrets/AnsibleVault.txt < A Strong Encryption password here >
(ESC, wq! )
Then, in your ansible.cfg file stored in the same location as the playbooks add the following line under [defaults]
The playbook will now securely and automatically authenticate without the need for prompts or for insecurely saving naked credentials in the clear.
Latest tool – Application Programmable Interfaces (APIs) for Infrastructure
APIs have finally arrived for infrastructure in the form of RESTful interfaces on switches and routers, on the Cisco Catalyst 9000 series for example, and other appliances and web services. I have had great success with F5’s AS3 API. Cisco.com has amazing APIs. Cisco Prime Infrastructure and Cisco Identity Services Engine APIs are extremely capable and easy to use. BlueCat Address Manager has an API. They are popping up everywhere!
Command Line Interface: cURL
Client Uniform Resource Locator (cURL) is a command-line tool used to interact with an API. As of May 2018 cURL is even included in Windows by default.
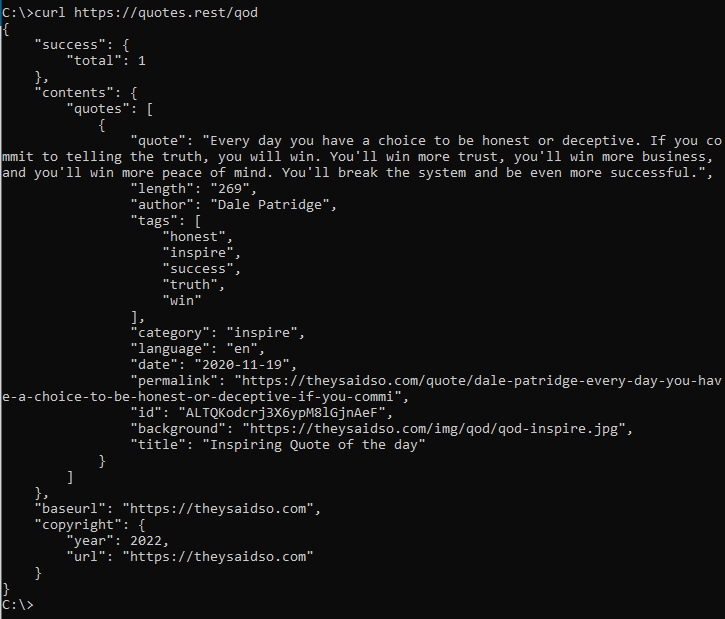
Try it yourself – launch a command prompt (Start -> Run; cmd) and type in:
curl https://quotes.rest/qod
You should get back a Quote of the Day in JSON from the public open RESTful API:
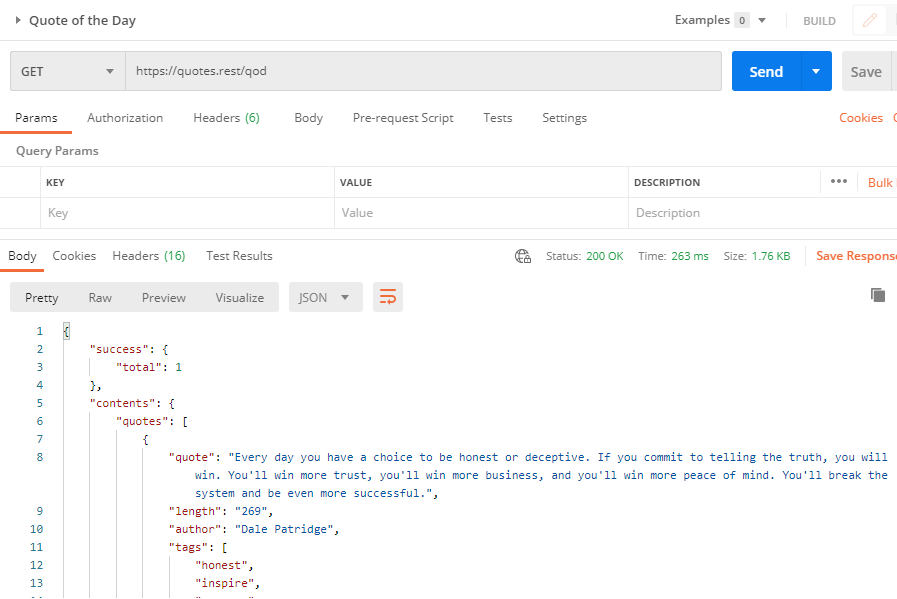
Graphical User Interface: Postman
Postman is a GUI API client. Postman can be used for quick and simply API interactions but is also a very powerful API automation and development tool that should not be dismissed as just a simple API browser.
The same Quote of the API would look like this in Postman:
Automation: Ansible URI Module
Ansible has a universal module, the URI module, that allows for API automation. The follow Ansible playbook, quoteoftheday.yml, can be created to automate the Quote of the Day.
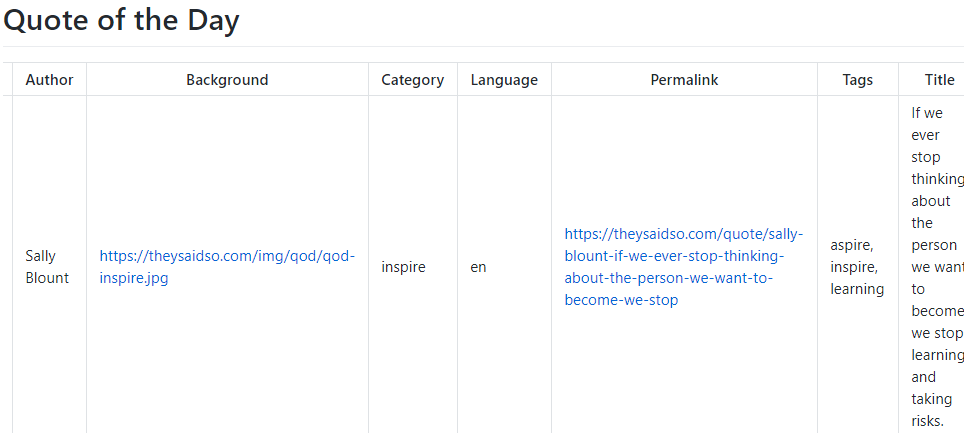
Using additional Ansible tools the JSON can be manipulated to create usable reports from the JSON.
The Quote of the Day playbook is available on Automate Your Network’s GitHub.
The foundation here is parsing. Using the Genie library framework various infrastructure CLI commands are parsed and transformed into JSON output. From there pyATS can run automated boolean tests against the Genie parsed returned key-value pairs. xPresso is a GUI based ecosystem that provides for RBAC, scheduling, and much more advanced and easy to build testing workflows.
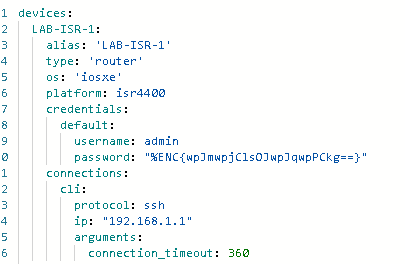
Similar to Ansible which has connection strings inside group variables CTAS uses testbed files which describe and provide shell connectivity to run the parsing and testing.
A sample testbed file for a Cisco ISR. Note the password is encrypted using pyATS cryptography methods.
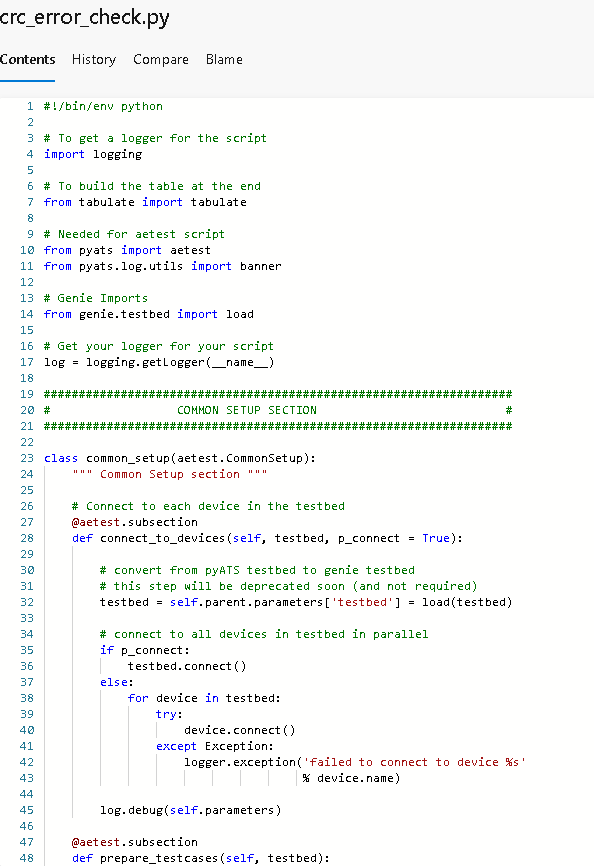
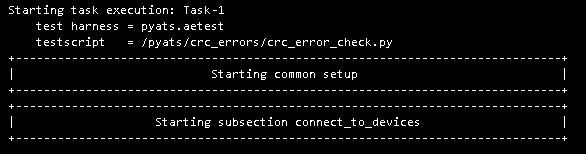
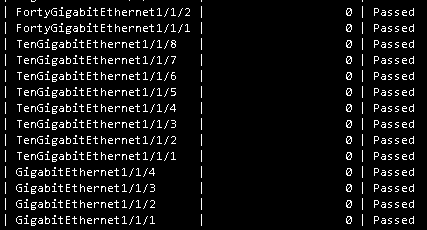
A sample crc_errors pyATS test file, written in Python. This test could be used with the ISR testbed to check for CRC errors on all interfaces.
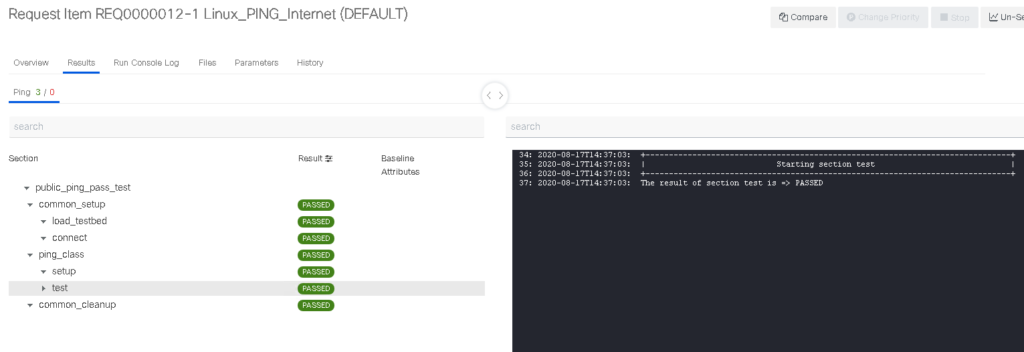
A sample log, taken from an AzureDevOps CI/CD release inside a Docker container image:
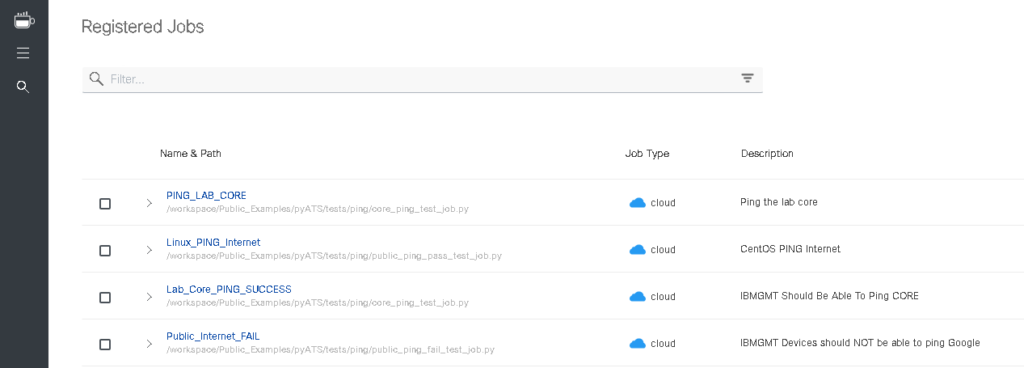
xPresso also offers the automation and orchestration capabilities:
Summary
Over the past three years my toolkit as a network engineer has grown dramatically from a humble text editor and a file transfer program to dozens of new tools each with their own amazing capabilities. In short – go get these tools and start using them to solve problems.
– Git – VS Code – VS Code Extensions – GitHub account and repositories for public use – AzureDevOps for Enterprise use – Linux of any flavour – Ansible – Python – Docker – Postman – cURL – Ansible URI module – YAML experience – JSON experience – Jinja2 templating experience – Markdown experience – HTML experience – Mind map transformations – Genie parsers – pyATS – xPresso
I am always open to questions, comments, or feedback if you need help getting started!
Downloading the tools and exploring yourself is the best way to get started but I’m here to help!
Infrastructure as Code and Network Automation – Where to Start
Learning any new skill takes time, patience, a willingness to try and fail, and ideally continuously learn and grow from our mistakes until we grow more and more proficient. The number one question I get is “How do you get started?”. I got started the hard way – trying to automate a tactical, one-time, unique, complicated, large-scale problem out of necessity with little time to learn the best way to approach such a problem. This post is to provide you with safe, easy, valuable, scalable, Ansible playbooks you can copy, study, and modify to fit your infrastructure. I want to stress that the following code does not attempt to change, modify, add, remove, update, or delete any data or configurations. They simply connect, securely, to a target host or set of hosts, capture stateful facts, that is to say, truthful key-value pairs and lists of information about the current state or configuration, parse those facts, and then transform them into useable, human-readable, automated documentation.
TL:DR
– Documenting enterprise networks and servers is tedious work at best. – Most enterprise documentation is, for a lack of a better word, wanting, if it exists at all. – Various Ansible modules can be used to gather stateful, truthful, facts from infrastructure. – Not limited to network devices. Windows, Linux, VMWare provide facts to Ansible as well. – Easy. – After you capture facts they are easily transformed into automated state documentation. – RAW JSON, Nice JSON, Nice YAML, CSV (spreadsheets!), Markdown, and interactive HTML mind maps from Ansible facts. – Scales n+x devices. – Safe, secure, no possibility of disrupting the network. Think of it as running a bunch of show commands or doing HTTP GETs. – Loved by management everywhere.
Enter: Ansible
If you are familiar with me at all you likely already know Ansible is my automation tool of choice. If you are new around here – let me tell you why. I believe Ansible is so easy that I can write a simple blog post with a few lines of code that you should be able to reproduce and make it work for you. There is little to no barrier to entry and your solution complexity will scale along with your personal growth and muscle memory with the tool. So let’s get started.
Linux
You are going to need a Linux environment. If you are a traditional Windows user who may not have access to a RHEL, CentOS, Debian, Ubuntu, or other Linux platform you can use the Windows Subsystems for Linux (WSL2) on Windows 10 to run a Linux environment.
For example to install Ubuntu on Windows 10:
Right-click the Windows Start icon – select Apps and Features.
In the Apps and Features window – click Programs and Features under Related Settings on the right side of Apps and Features.
Click Turn Windows Features On or Off in the left (with the shield icon) side of the Programs and Features window.
Scroll to bottom of the Features window and put a check mark beside Windows Subsytem for Linux; Click Ok and close the open windows.
Launch the Microsoft Store.
Search for Ubuntu – click the first result.
Click Install.
Wait for Ubuntu to install.
Press Windows Key and start typing Ubuntu – click and launch Ubuntu.
The first time Ubuntu launches it has to setup – give this some time.
Enter your username and password for Ubuntu.
Update Ubuntu – this step will take some time.
$ sudo apt update
$ sudo apt-get upgrade -y
Install Ansible
Make sure Python is installed.
$ sudo apt-get install python -y
Install Ansible.
$ sudo apt-add-repository ppa:ansible/ansible
$ sudo apt-get update
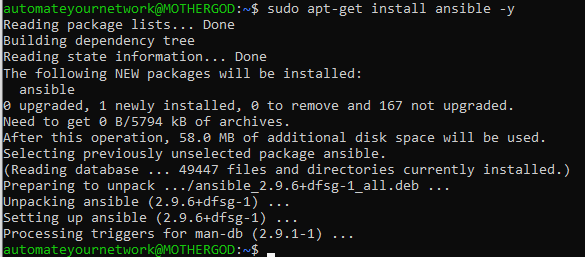
$ sudo apt-get install ansible -y
hosts
You will need a hosts file. This is the foundation for a good, scalable, modular Ansible install base. Hosts can be organized hierarchically to match your physical or logical topologies. The machine hosting Linux must be able to resolve the hosts if you use their hostname and have IP connectivity for the playbooks to work. For a standard Cisco enterprise design you might have a hosts file like this:
Ansible needs to be able to securely connect to the targeted host. There are no agents and Ansible uses SSH, WinRM, or HTTPS as transport protocols. For most devices a username and password are required to authenticate and authorize the Ansible session. There are a few ways that this can be handled but for beginner’s I would setup a prompted mechanism to get going. Eventually you can learn about Ansible Vault but to avoid hard coding plain-text passwords to get started, a mistake even I made when I was beginning to use Ansible, start with prompted interactive playbooks where a human has to enter a username and password.
These connections strings are first setup in what’s known a group variable or group_vars where all of the individual hosts in a group (ie dist01 and dist02 in DIST group) inherit the variables set. Because we have everything nested in [ENTERPRISE], in a folder called group_vars, create the following file.
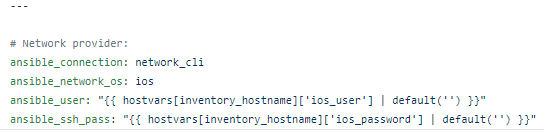
This tells all the hosts in the Enterprise hosts group to use the Ansible network_cli connection mechanism; that the target operating system is Cisco IOS; and that the Ansible user and Ansible passwords are variables.
Playbooks
At the heart of Ansible are playbooks. Playbooks are YAML files made up of key-value pairs and lists of serially executed tasks. The first step in the playbook is to establish the scope of the playbook tasks from either a group or single host in the hosts file or locally using the localhost option. For this example target the Campus Access layer. One of the tasks in these facts playbooks will either call a specific facts module (like ios_facts), use the setup module, or target an API using the uri module. But first, we have to prompt the user for their credentials and store them in variables to be used by the Ansible connection strings in the group vars files.
Create a file called CiscoAccessFacts.yml inside the playbooks folder as follows:
Now that we have connection to our devices in the ACCESS group using the prompted credentials which are passed to the group_vars Ansible connection strings we are ready to perform the actual IOS Facts Ansible task as follows:
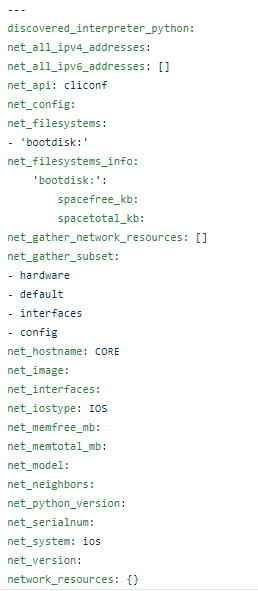
– name: Gather Ansible IOS Facts ios_facts: gather_subset: – all
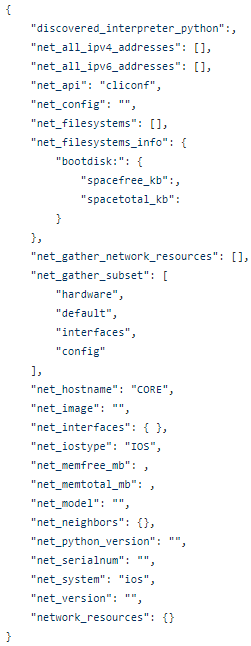
That’s it! Now we have captured the Ansible IOS Facts. Because these are Ansible facts we do not need to register them as a variable; they are stored in the ansible_facts magic variable.
To print your facts to the screen you can use the Ansible debug with the following message as the next task in your playbook:
– debug: msg=”{{ ansible_facts }}”
Save and run the file.
ansible-playbook CiscoAccessFacts.yml
Answer the prompts for credentials. After authenticating and gathering the facts something like this should be displayed on the screen, except with actual data values completed.
Cisco NXOS_Facts
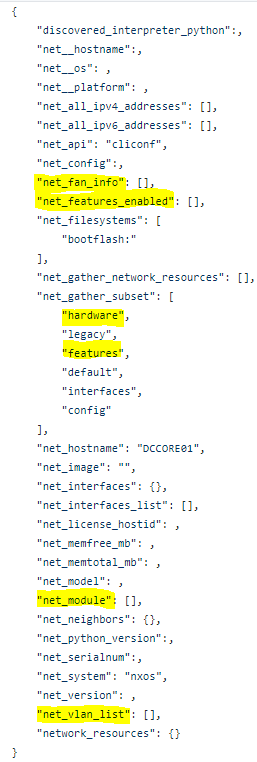
Much like IOS, Ansible has an NXOS fact module as well. The NXOS module, as expected, provides the same baseline facts as IOS but adds hardware facts such as modules, fans, and power supplies as well as software facts such as features, licensing, and VLANS.
Copy the Campus files and update them accordingly. Typically in a data center where the NXOS facts will gather there is HA configured and paired-devices. These playbooks have been tested on Nexus 9000, Nexus 7000, Nexus 5000, and Nexus 2000 FEX modules.
– name: Gather Ansible NXOS Facts about DC Access nxos_facts: gather_subset: -all
– debug: msg=”{{ ansible_facts }}”
Save and run the playbook.
ansible-playbook CiscoNXOSAccessFacts.yml
Review the output on the screen and notice the new sets of facts only NXOS can provide.
Notice again the change from ios_facts to nxos_facts but that’s about it. Now you have all of your Data Centre Ansible Facts as well as your Campus!
This is great right? What other facts can we get? How about compute facts! Yes that’s right we can use Ansible to get Windows, Linux, and VMWare (bare metal or virtual guest) facts too using more or less the same steps.
Compute Facts
Ansible is not limited to gathering facts from Cisco or other network devices. In fact Ansible can be used to gather even more facts from compute platforms like Microsoft Windows, Linux of any flavour, and VMWare (both bare metal hosts and virtual guests).
Microsoft Windows Facts
That’s right. We can use Ansible, a Linux-only tool, to gather Microsoft Windows facts! More or less the same approach and building blocks are the same; a hosts file, group vars file, and playbook. Windows hosts, like Cisco hosts, can be logically organized anyway you see fit. Windows hosts can be grouped by product line, OS, function, location, or other values. For now create a simple hosts file with one parent group called Windows.
The requirements and WinRM installation and configuration guide can be found here. Either HTTP or HTTPS can be used because Kerberos is ultimately securing the payload, even if the transport is only HTTP.
hosts [Windows] Server01 Server02
The group vars Ansible connectivity variables for Microsoft Windows are as follows:
Note the Ansible WinRM scheme needs to be setup as either HTTP or HTTPS and the corresponding Ansible port (5985 for HTTP; 5986 for HTTPS) needs to be selected depending on the transport protocol. Ansible connection is using WinRM and the WinRM transport is specified as Kerberos.
Now in the playbook target the Windows group of hosts and use the same prompted mechanism code as before updating it to reflect Windows cosmetically. The only change to the Facts task is to change from the ios or nxos facts module to the setup module.
– name: Gather Ansible Windows Facts about Windows hosts setup: gather_subset: -all
– debug: msg=”{{ ansible_facts }}”
Save the playbook as playbooks/WindowsFacts.yml and run the playbook.
ansible-playbook WindowsFacts.yml
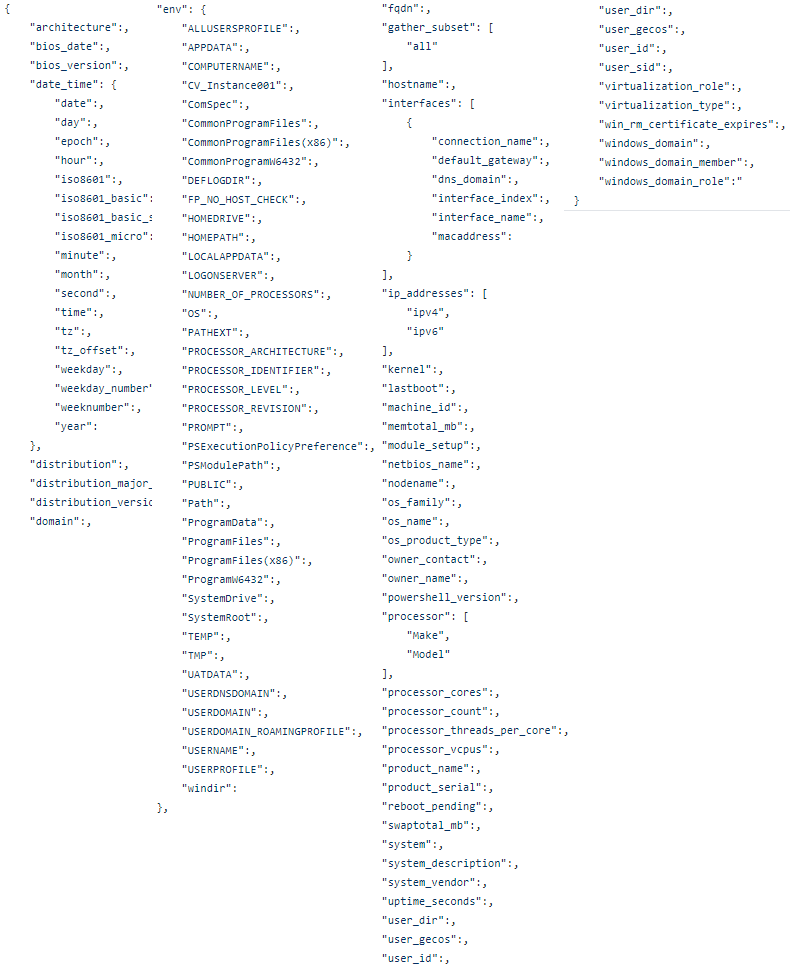
Notice all of the amazing facts Ansible can discover about a Windows host or groups of Windows hosts.
Linux Facts
The great thing about the setup module is that it can be used against Windows and Linux hosts. Meaning you simply need to clone the Windows artifacts (group_vars file, playbook, and hosts inventory) and refactor all of the Windows references to Linux (Linux.yml group var file; [Linux] hosts list; Windows to Linux cosmetic references) but the core Ansible task remains the same:
– name: Gather Ansible Linux Facts about Linux hosts setup: gather_subset: -all
– debug: msg=”{{ ansible_facts }}”
However, much like IOS vs NXOS facts, the amount of Linux facts eclipses even the huge list of facts from the Windows hosts. This is due to the native Ansible / Linux coupling and support.
VMWare
VMWare does not use the generic setup module and has a specific facts module like Cisco IOS or NXOS. VMWare facts actually use the downstream VSphere API and there are 2 additional required fields in addition to an authorized username and password; hostname and esxi_hostname. This module, vmware_host_facts gathers facts about the bare metal hosts; not the virtual guests. From my testing I found it best to target the hostname and esxi_hostname using the esxi hostname in the Ansible hosts inventory file.
Very rich JSON similar to that of Linux are provided back including all hardware information about virtual NICs, VMWare datastores, BIOS, and processors.
Microsoft Azure
Even clouds have Ansible Facts! Azure Facts are actually even easier to retrieve because of the simplified authentication mechanism. Username and password still works or you could setup Service Principal Credentials. Inside Azure you need to create an account with at least API read-only permissions. There are some prerequisites to install. First pip install the Ansible Azure libraries.
$ pip install ‘ansible[azure]’
You can create the following file $HOME/.azure/credentials to pass credentials to the various Azure modules without username and password prompts or credential handling.
In the list of Ansible cloud modules find the Azure section. Each Azure module has two components – a config module and an info (facts) module.
Using the same process, along with JSON_Query, and a with_together loop, for example, capture all Azure Virtual Network info. First we have to capture the Azure resource groups and then pass the resource group along to a second API to get the associated networks.
– name: Get Azure Facts for Resource Groups azure_rm_resourcegroup_info: register: azure_resource_groups
– name: Get Azure Facts for all Networks within all Resource Groups azure_rm_virtualnetwork_info: resource_group: “{{ item.0 }}” register: azure_virtual_network with_together: – “{{ azure_resource_groups | json_query(‘resourcegroups[*].name’) }}”
Ok great. So what? What can I do with these facts?
So far we have simply dumped the facts to console to explore the various modules. What I like to do with these facts is to create living, automated, stateful, truthful, human-readable, management and operations loves me for it, documentation. With a little work and changing the playbooks from interactive on-demand playbooks to non-interactive fully scheduled and automatically executed periodically these playbooks can now run all by themselves creating snapshots of state in the form of reports.
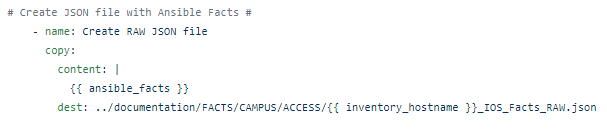
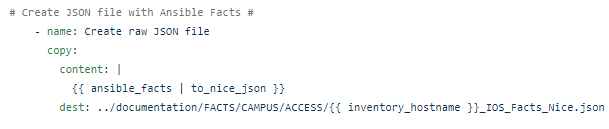
First I like to capture the RAW JSON as a forensic artifact. The raw facts unchanged and unfiltered, in case audit, compliance, security, or other possible downstream machine code that requires unchanged RAW JSON.
This is easily done in Ansible using the copymodule. We have the RAW JSON in a variable, the Ansible magic variable {{ ansible_facts }}, we just need to copy it into a file.
We will need a repository for the new output files so create a documentation folder structure with subfolders for your various platforms.
Add the following line of code, customizing the output file name based on the playbook environment, after the debug. For example the IOS Access Facts playbook.
The Ansible magic variable {{ inventory_hostname }} can be used to reference the current iterated inventory host file target which we will use to identify the parent switch for each of the facts.
Save and re-run the playbook. All the IOS facts will now be, albeit ugly and unusable, stored in a RAW JSON file.
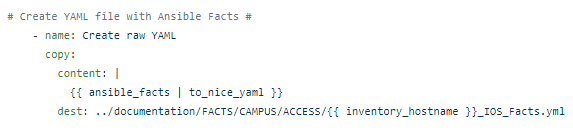
to_nice filters
Ansible has various filters that can be used to help parse or transform data. Using two of these filters, to_nice_json and to_nice_yaml, we can create human-readable, nice, pretty, and easy to consume JSON and YAML files.
Simply copy and paste the Create RAW JSON file task and modify the new stanzas as follows:
Save and re-run the playbook. Now you should have 2 human readable files. The _Nice.json (displayed in the first screenshot) file and now an even easier to read YAML file:
Traditional Reports from Facts
While the RAW and Nice JSON and YAML files are great for programming, data modeling, logic, templating, and other infrastructure as code purposes they are still not exactly consumable by a wider audience (management; operations; monitoring; capacity planning). Using Ansible’s ability to parse the registered variable JSON and another filter, JSON_Query, an SQL-like tool used to query and parse JSON, we can capture individual fields and place them into CSV or markdown ordered structure.
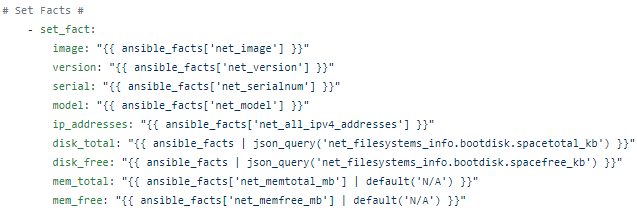
First we are going to use Ansible’s set_facts module to create our own variables out of the key-value pair and lists in JSON which we can then re-use to create reports.
Now that we have set our own facts / variables from the JSON facts we simply put them into order to create a CSV file.
– name: Create Cisco IOS Access Facts CSV copy: content: | {{ inventory_hostname }},{{ image }},{{ version }},{{ serial }},{{ model }},{{ disk_total }},{{ disk_free }} dest: ../documentation/FACTS/CAMPUS/ACCESS/{{ inventory_hostname }}_IOS_facts.csv
Some of the RAW JSON characters need to be cleaned up to pretty up the CSV file. The Ansible replace module can be used in combination with Regular Expression (RegEx) to clean up the file as follows:
– name: Format and cleanup CSV replace: path: ../documentation/FACTS/CAMPUS/ACCESS/{{ inventory_hostname }}_IOS_facts.csv regexp: ‘[|]|”‘ replace: ”
– name: Format and cleanup CSV replace: path: ../documentation/FACTS/CAMPUS/ACCESS/{{ inventory_hostname }}_IOS_facts.csv regexp: “‘” replace: ”
Now we can add the header row to the CSV using Ansibles lineinfilemodule.
Save and re-run the playbook. You should now have a CSV file that looks similar to this but with data values in the rows following the header row.
Markdown
Think of markdown as HTML-lite. Markdown reports from facts render nicely in browsers or VS Code with the Markdown Preview extension. More or less the same process as the CSV file place the variables between pipes and create a header row. Markdown has strict rules to make well-formed .md files so pay close attention.
(There is more formatting clean up required which you can find in the GitHub repo links at the bottom)
Using the Ansible looping mechanism, with_items, we need to create 3 header rows for the valid markdown file as follows:
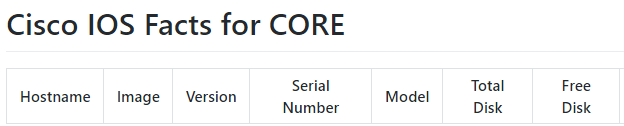
– name: Header Row lineinfile: path: ../documentation/FACTS/CAMPUS/ACCESS/{{ inventory_hostname }}_IOS_facts.md insertbefore: BOF line: “{{ item.property }}” with_items: – { property: ‘| ——– | —– | ——- | ————- | —– | ———- | ——— | ‘ } – { property:’| Hostname | Image | Version | Serial Number | Model | Total Disk | Free Disk |’ } – { property:’# Cisco IOS Facts for {{ inventory_hostname }}’ }
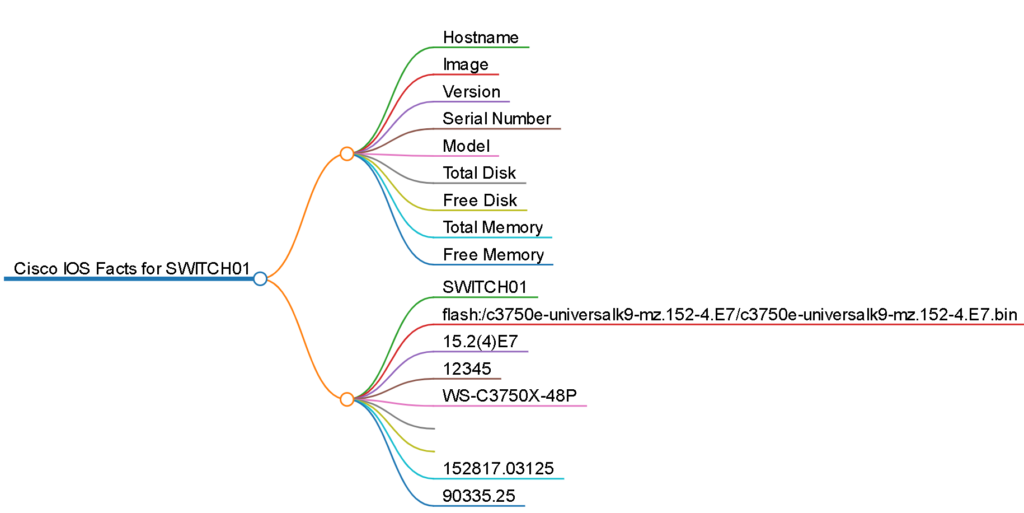
This generates a mark down file like this:
Mark Map / Interactive HTML Mind Map
Now that we have a well-formed markdown file we can use a relatively new tool to create a relatively new file type. Markmap is a node.js tool that can be used to transform any markdown file into an interactive HTML mind map.
First install the required libraries (node.js and npm)
This will generate an interactive HTML page with a mind map of the markdown like this:
Summary
Ansible facts are a great way to get started with network automation and working with infrastructure as code. They are safe, non-intrusive, valuable, and typically management approved playbooks to get you started towards configuration management. They are also a great way to document that enterprise network you’ve been neglecting. Using these simple tools and techniques your full enterprise network, from campus to data centre; cloud to WAN; Cisco to Microsoft to Linux to VMWare to Azure or AWS; can be automatically documented with real time stateful facts!
GitHub Repositories
Here are a collection of Automate Your Network developed GitHub repositories you can use to explore the code or even transform into playbooks customized for your environment.
Wow! I was actually invited to present a 30-minute break-out session at AnsibleFest! Incredible!
You can still watch the session by registering for free and searching for my name or “Automate Your Network: Introducing the Modern Approach to Enterprise Network Management” in the session catalogue.