I joined the amazing duo of Brandon Heller and Derick Winkworth from the simply incredible Seeking Truth in Networking podcast discussing network automation in the real world.
I really enjoyed having this conversation and think you will too!

The modern approach to enterprise network management
I joined the amazing duo of Brandon Heller and Derick Winkworth from the simply incredible Seeking Truth in Networking podcast discussing network automation in the real world.
I really enjoyed having this conversation and think you will too!
I had the pleasure of collaborating with my friends Dana Iskoldski and Chris Meyer over at BlueCat exploring and automating DNS, DHCP, and IP Address Management (IPAM) (DDI) with the BlueCat Address Manager (BAM) and the BlueCat Gateway.
Infrastructure as Code and network automation is not always about switches and routers – there is incredible value to be found automating all the way up the stack into the critical Layer 7 services like DNS and DHCP; or transforming from Microsoft Excel-based IP address management to a fully automated solution.
In this 2-part series watch us explore and ultimately automate DNS using the BlueCat BAM and Gateway APIs with Postman, Ansible, and Python
In the wake of some very high profile IT security breaches and state sponsored attacks using compromised software today I wrote some infrastructure as code Ansible playbooks to create some business-ready documentation to help us understand our Cisco software version footprint against what release the vendor recommends. It is very important to run “Safe Harbor” code in the form of the Gold Star release. These releases are as close as it gets to being bug-free, secure, tested, and supported in production environments.
The ‘old-way’ involved getting the Cisco Part ID (PID) or several PIDs and looking up the recommended release on Cisco.com using an ever deepening hierarchy of platforms, operating systems, and PIDs. At scale this is like a day’s worth of work to go gather all of this information and present it in a way the business can understand.
Building on my recent success with the Serial2Info Cisco.com API as well as Ansible Facts I thought this might be another nice use-case for business-centric, non-technical (not routes, IP addresses, mac addresses, etc), extremely important and critical insight.
Can I automatically get the PID from a host or group of hosts and provide it to the Cisco.com Software Suggestion API building business-ready reports in CSV and markdown?
Answer: Yes!
Again you are going to need:
* A Linux Host with SSH access to your Cisco IOS devices and HTTPS access to the Cisco.com API
* Credentials for the host and for the OAuth2 API
* We are not using Genie parsers here so just “base” Ansible will work
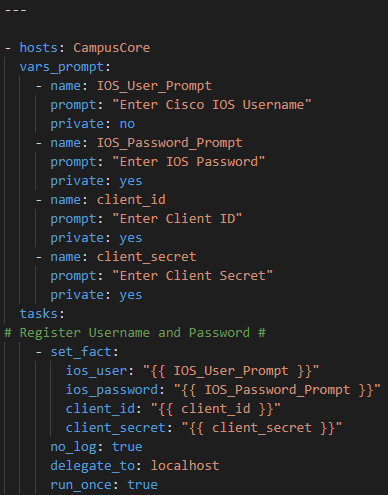
Step 1. Setup credential handling
Create a playbook file called CiscoCoreRecommendedReleaseFacts.yml
Again I use prompted methodology here same as the Serial2Info API

Gather the username, enable secret, Cisco.com API ClientID, Client Secret

Step 2. Gather Ansible Facts
Using the ios_facts module gather just the hardware subset

Because we are using Ansible Facts we do not need to register anything – the JSON is stored in the Ansible magic variable ansible_facts
I need 2 keys from this JSON – the PID and ideally the current running version. These can be found as follows in the ansible_facts variable:

Which is accessed as ansible_facts.net_model

Which again is accessed as ansible_facts.net_version
With the information above – without going any further – I could already build a nice report about what platforms and running versions there are!
But let’s go a step further and find out what Cisco recommends I should be running!
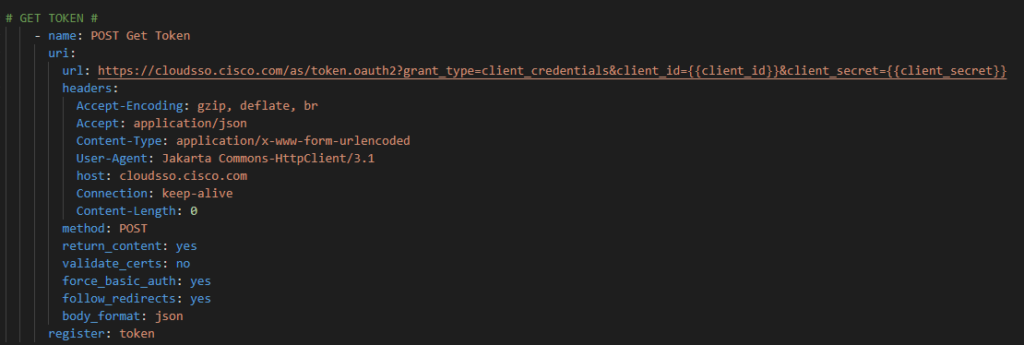
Step 2. Get your OAuth2 token
First, using the Ansible URI module

We need to get our token using the registered prompted credentials.

The API requires the following headers and body formatting; register the response as a variable (token):

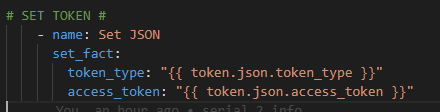
We have to break apart the RAW JSON token to pass it to the ultimate Recommended Release API:

Now we are ready to send PIDs to the API.
Step 3 – Send PID to Cisco.com API
Again using the URI module:

Here we pass the ansible_facts.net_model Fact to the API as an HTTP GET:

The headers and body requirements. Notice the authentication and how we pass the Bearer Token along. We also register the returned JSON:

Here is what the returned JSON looks like:
The highest level key is json or accessed via RecommendedRelease.json

There is a productlist

Which as you can see is a list as denoted by the [ ]
Inside this list is another product key with the values from the API about the product itself

A little further down we find the recommended software release

Step 4 – Transform technical documentation into business ready CSV / MD files
These JSON and YAML (I also use the | to_nice_yaml filter to create a YAML file along with the JSON file) files are create for technical purposes but we can do a bit better making the information more palatable using business formats like CSV and mark down.
It is just a matter of using Jinja2 to template the CSV and Markdown files from the structured JSON variables / key-value pairs.
Add a final task in the Ansible playbook that will loop over the CSV and MD file types using the template module to source a new .j2 file – CiscoCoreRecommendedReleaseFacts.j2 – where our logic will go to generate our artifacts.

The Jinja2 starts with an If Else EndIf statement that checks if the Ansible loop is on CSV or not. If it is it uses the CSV section of templated file format otherwise it uses markdown syntax.

First we want to add a CSV header row

Then we need a For Loop to loop over each product in the productList

Now we add our “data line” per product in the loop using the various keys
Hostname for example uses the Ansible magic variable inventory_hostname

Then we want the Base PID. We use the Ansible default filter to set a default value in case the variable happens to be empty.

We continue accessing our keys and then we close the loop.

Now we need to create the Markdown syntax


And the same logic for the “data row” but with pipes instead of commas. Make sure to close off the If statement

Step 5 – Run playbook and check results
We run the playbook as ansible-playbook CiscoCoreRecommendedReleaseFacts.yml

Answer the prompts

Let the playbook run and check the results!

Again with a few free, simple tools like Ansible and the Cisco.com API we can, at scale gather and report on the current running version and the vendor recommended version quickly and easily and fully automatically!
Now go and start protecting your enterprise network armed with these facts!
Layer 9 issues – finance – are often some of the most challenging a network engineer faces. Contract management can be particularly difficult in any scale organization especially if you are not “sole source” purchasing. Serial numbers and contracts are also not typically things the “network people” want to deal with but when that P1 hits and you try to open a SEV 1 TAC CASE – only to find out you are not under contract – I’ve been in less terrifying car accidents than this nightmare scenario.
I have good news ! Using a mix of automation and developer-like tools the network engineer can now create a real source of truth that, along with routes and MAC address-tables and other technical information, can include inventory and contractual business documentation from stateful, truthful, real-time, facts from Cisco.
Ok so let’s get into it!
As a rough outline for our logic here is the use case:
Can I automatically gather the serial numbers from Cisco device hostnames and then provide them to Cisco and get my contractual state for each part on each device?
Answer: YES !
* Linux host with Ansible, Genie parser
* Linux host requires both SSH access to the Cisco host and Internet Access to the OAuth2 and Cisco.com API HTTPS URLs
* Cisco SmartNet Total Care – I have written up instructions in this repo under the “OnBoarding Process” section
Step 1 – We will need to get the serial number for every part for a given hostname. For this we will use the standard show inventory command for IOS using the Ansible ios_command module. I will be using prompted methods for demonstration purposes or for on-demand multi-user (each with their own accounts) runtime, but we could easily Ansible Vault these credentials for fully hands-free run time or to containerize this playbook. I am also targeting a specific host – the Core – but I could easily change this to be every IOS device in the enterprise. This playbook is called CiscoCoreSerial2InfoFacts.yml
First prompt for username, enable secret, Cisco Customer ID, Cisco Customer Secret and register these variables:
Then run the ios_command show inventory and register the results in a variable.

Step 2 – Parse the raw output from the IOS command
Next, we use Genie to parse the raw results and register a new variable with the structured JSON. Genie requires, for show inventory, the command, the operating system, and the platform (in this case a Cisco 6500)

And here is what that structured JSON looks like:
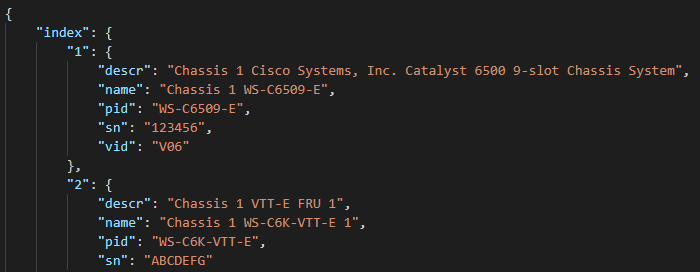
So now we have a nice list of each part and their serial number we can feed the Cisco.com API to get back our contract information.
Step 3 – Get an OAuth 2 token from Cisco web services.
Cisco.com APIs use OAuth2 for authentication meaning you can not go directly against the API with a username and password. First you must retrieve a Bearer Token and then use that limited time token within it’s lifetime against the ultimate API.
Using the Ansible URI module go get a token and register the results as a variable. Provide the Customer ID and Client secret prompts to the API for authentication. This is an HTTP POST method.
With the new raw token setup the token type and access token from the raw response
Step 4 – Provide token to the Serial2Contract Cisco API to get back contractual information for each serial number.
Now that we have a valid token we can authenticate and authorize against the Cisco SmartNet Total Care Serial Number 2 Contract Information API.
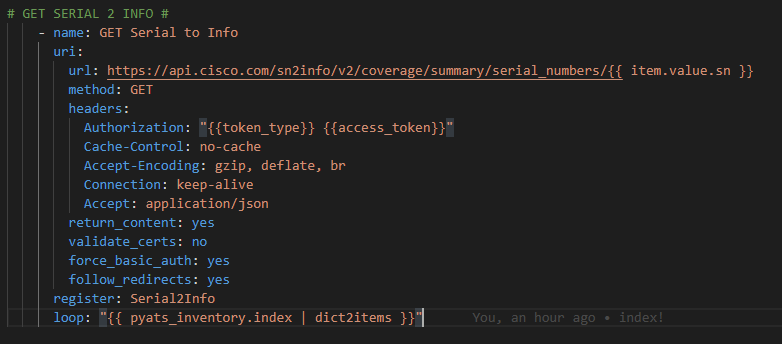
In this step we are going to use an Ansible loop to loop over the Genie parsed structured JSON from the show inventory command providing the sn key for each item in the list. We need to use the Python | dict2items Ansible filter to transform the dictionary into a list we can iterate over.
The loop is written as
loop: “{{ pyats_inventory.index | dict2items }}”
And each serial number is referenced in the URL each iteration through the loop:
url: https://api.cisco.com/sn2info/v2/coverage/summary/serial_numbers/{{ item.value.sn }}
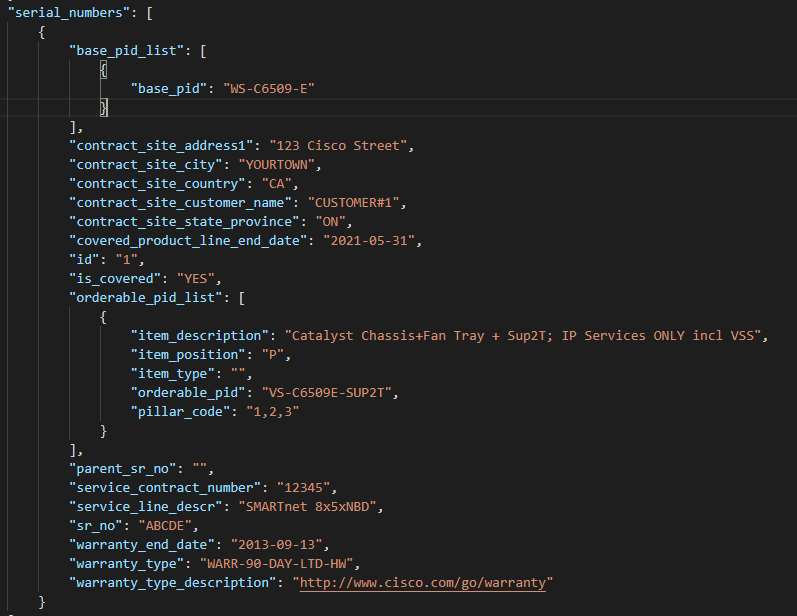
We register the returned structured JSON from the API as Serial2Info which looks like this:
So now I have the JSON – let’s make it a business ready artifact – a CSV file / spreadsheet and a markdown file – using Jinja2
Step 5 – Using Jinja2 lets template the structured JSON into a CSV file for the business.
Create a matching Jinja2 template called CiscoCoreSerial2InfoFacts.j2 and add a task to Ansible that uses the template module to build both a CSV file and a markdown file from the JSON.

In the Jinja2 file we need a section for CSV (if item = “csv”) and a section for markdown (else) based on their respective syntax. Then we need to loop over each of the responses.
result in Serial2Info[‘results’] is the loop used. I also add a default value using a filter | default (‘N/A’) in case the value is not defined. SFPs for example do not have all of the fields that a supervisor module has so to be safe it’s best to build in a default value for each variable.
The final Jinja2 looks something like this:

Which results in a CSV and Markdown file with a row for every serial number and their contractual facts from the API.

Large scale inventory and contract information can easily be automated into CSV spreadsheets that the business can easily consume. Ansible, Genie, Cisco.com APIs, Jinja2 templating and a little bit a logic come together into an automation pipeline that ensures contractual compliance and inventory fidelity at scale!
2020 has been an extremely challenging year that required a lot of digital innovation for us at the House of Commons.
The Speaker of the House of Commons, the Clerk, and Members of Parliament recognize my boss, CIO Stephan Aube, and his teams efforts in this clip from ParlVu (a cloud-based service I helped implement)
“The IT department under Mr. Aubé has been very visionary and has been planning to accommodate whatever the Members of the House really want to do…I wanted to compliment them and recognize their hard work and diligence in making sure everything is there for us when we decide as a House.” – Honourable Anthony Rota
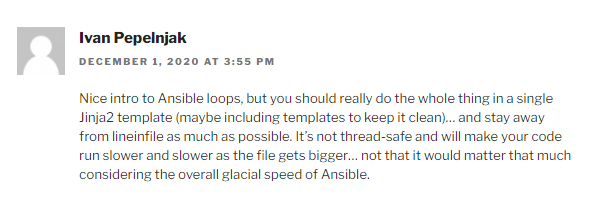
When Ivan Pepelnjak has advice for you – take it!
I wrote a post about untangling dynamic nested loops in Ansible.
In another recent post about trying to improve Ansible performance I didn’t get very far – but this could be the silver bullet I’ve been looking for to both optimize and make my Fact / Genie parsing playbooks more elegant code but also to bring my run times down so I can bring this from the lab to production.
One of the reasons why I perked up at Ivan’s generous suggestion is because I am a big fan and heavy user of Jinja2 templates already to generate intended configurations (Cisco IOS, NXOS configurations; JSON files for API POST) and documentation (intended configs in CSV, markdown, and HTML) – but I had just never thought of implementing them to create my documentation from received data!
My old way involved taking the structured JSON and using lineinfile or copy to create my output files. This was slow. Very slow.
Copy method:

Line In File method:

So I already have everything I need content wise – a header row and the data rows – I just need to move this into Jinja2 format. As it turns out there are some added benefits beyond just performance that I will highlight.
My quick use case was my CiscoNXOSFacts.yml playbook against 2 7Ks just gathering facts (nxos_facts) and transforming the structured JSON into business documentation.
– Create Nice JSON file from facts – Ansible | to_nice_json filter
– Create Nice YAML file from facts – Ansible | to_nice_yaml filter
– Create CSV file from facts
– Create markdown file from facts
– Generate HTML from markdown
So the first refactoring is the actual task from using copy or lineinfile to using template. Template needs a source (a new Jinja2 template file we will create in our next step).

Template also needs a destination. Here is where we can use the programmatic capabilities of Jinaj2 to simplify, optimize, and massively improve performance by setting up a simple loop and create both files. Wait files plural? Yes. My old way involved creating 2 separate files in 2 separate tasks. Now that I am using Jinja I can use variables – one item being “csv” and the other item being “md” – and pass them to the template for processing.

So create a Jinja2 template file called CiscoNXOSFactsTemplate.j2 to create your CSV and Markdown files.
Before I show the template I want to highlight another massive improvement to using Jinja2 – Jinaj2 is able to iterate naturally over dictionaries while my previous method had to pass the structured JSON through the | dict2items Ansible filter (against adding processing time). This simplifies the code quite a bit.
In the template we will test if the loop is on csv or md and create either a csv or md formatted output file.

Else if item is md create the markdown file format

One last and very important comment and benefit of Jinja2 is that I do not need to use Regular Expressions “as much” to clean up the JSON. | dict2items leaves a lot of garbage JSON characters behind which I had to previously use processor intensive RegEx tasks to clean up. Now Jinja2 does this cleanup and conversion from RAW to Nice JSON for me!
I have only tested 1 playbook but I am very excited about this new refactored code !
Again this playbook “only” touches 2 physical devices but I have playbooks that potentially could be gathering facts and generating artifacts for hundreds of devices. But the results are pretty clear particularly the system time
Old way:
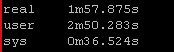
New way:
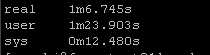
So roughly half the “real” time but look at the system time – from 36 seconds down a third to 12 seconds! WOW!
A big thanks to Ivan for taking the time to comment and point me in a better direction. You may not know this but when I started my automation journey one of my resources along with several books, Cisco DevNet, trial and error, was my IPSpace.net subscription. If you are looking for a very affordable and very comprehensive library of networking and automation knowledge this is a good place to start.

I’ve done many great things with Ansible but occasionally I come across a logical problem that may stretch the tool past it’s limitations. If you have been following the site I am on a big facts discovery and automated documentation movement right now using Ansible Facts and Genie parsers.
The latest parser I am trying to convert to documentation is the show access-lists command.

So we use the Ansible ios_command module and issue the command then parse the response. This is a playbook called CiscoACLFacts.yml
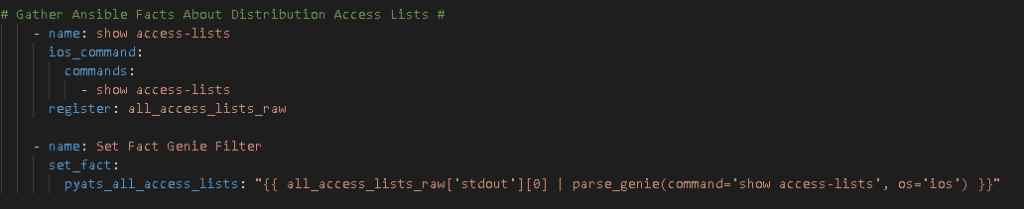
I always start with creating Nice JSON and Nice YAML from the structured JSON returned by the parsed command:
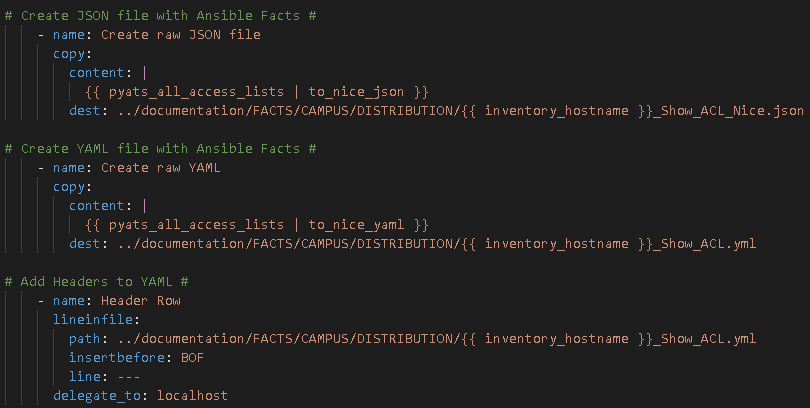
Then I examine the Nice JSON to identify “how” I can parse the parsed data into business documentation in the form of CSV, markdown, and HTML files.
And I have my CLI command converted into amazing structured human or machine readable JSON:
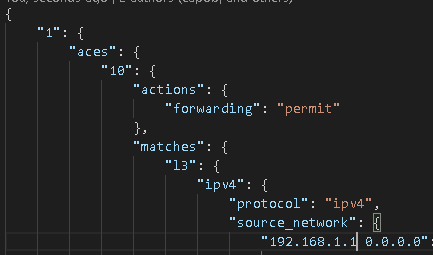
So here is where the logical challenge comes into play with Ansible.
As you know an Access Control List (ACL) is a list (hint: it’s right in the name) of Access Control Entries (ACEs) which are also a list. Both the ACL and the ACE are variable – they could be almost anything – and I need 2 loops: an outer loop to iterate over the ACLs (shown above is the “1”) and an inner loop to iterate over the ACEs (shown above as the “10”).
So I brush up on my Ansible loops. Looks like I need with_nested.
Problem: Ansible does not support dynamic loops as you would expect. Here is what I “wanted to do” and tried for a while before I figured out it wasn’t supported:
with_nested:
– “{{ pyats_all_access_lists | dict2items }}”
– “{{ item[0].value.aces }}”
No go. “Item not found” errors.
Here is the work around / solution:
Before I get into the loops a couple things to point out to anyone new to infrastructure to code or JSON specifically. The Genie parsed return data is not a list by default. Meaning it cannot be iterated over with a loop. We have to filter this from a dictionary – as indicated in JSON by the { } delimiters – into a list (which would be indicated by [ ] delimiters in the JSON if it was a list we could iterate over) – before we can loop over it.
| dict2items is this filter.
The loops:
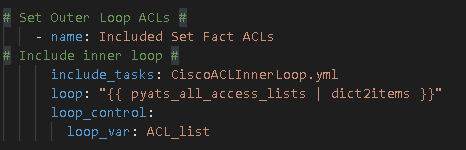
You can define the outer loop key using loop_var as part of loop_control along with include to build a dynamic outer / inner loop connection.
In order to create my CSV file:
1 – Delete the file outside the loops / last Ansible task before entering the loops

2 – * Important new step here *
We need to perform the outer loop, register the key for this outloop, and then include a separate YAML file that includes the inner loop task
3 – * Another important new step here *
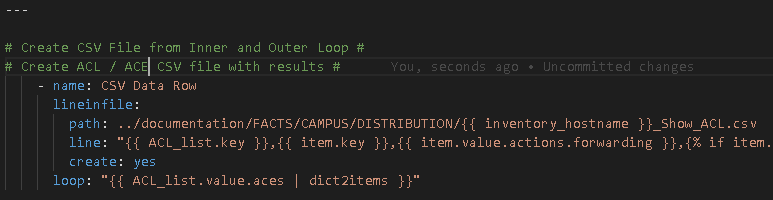
Create the referenced file CiscoACLInnerLoop.yml with the inner loop task, in this case, the task to add the rows of data to the CSV file
Things to identify in the above task:
The loop – it is using the outer loop (the loop_var) ACL_list as the primary key then we turn the .value.aces dictionary into another list with | dict2items giving us the inner list we can iterate over.
Important – the inner loop is what Ansible will reference from this point forward meaning item. now references the inner items. In order to reference the outer key you need to reference the loop_var again as seen on the line: “{{ ACL_list.key }},{{ item.key }}
This gives us the ACL then the individual ACE per row in the CSV file! Mixing the outer and inner loops!
Recommendation – you will notice the start of an {% if %} {% else %} {% endif %} statement – because almost everything in an ACL and ACE list is variable you should test if each item.value.X is defined first, use the value if its defined, otherwise use a hard coded value. As such:
{% if item.value.logging is defined %}
{{ item.value.logging }}
{% else %}
No Logging
{% end if %}
Next, back in the main playbook file, outside the loop, we finally add our CSV header row:

For the sake of keeping this short there is likely some Regular Expression replacements we need to make to clean up any stray JSON or to remove unnecessary characters / strings left behind but in essence we have the follow show access-lists command rendered into CSV:
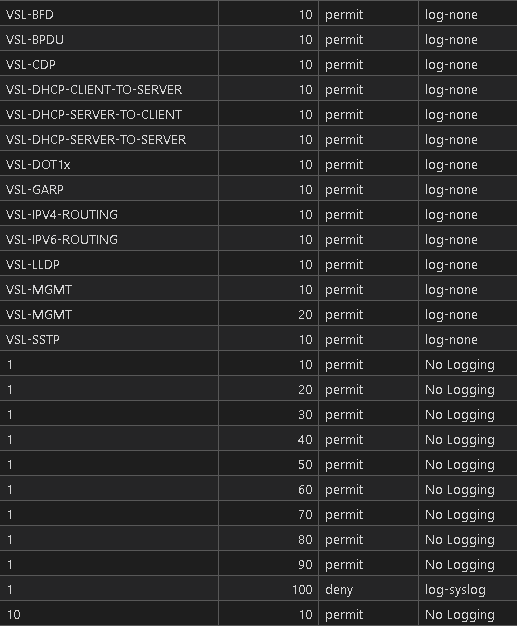
Operations, management, compliance and standard, and most of all IT SECURITY is going to love this! All of this is in a central Git repository so all of these artifacts are Git-tracked / enabled. All of the CSV files are searchable, sortable, filterable, and EXCEL ready for the business!
Before you give up on any problem make sure you find and read the documentation!
I have to revisit some previous use cases and problems now with fresh eyes and new capabilities because I had given up on transforming some previous dictionaries in dictionaries because I didn’t know what I was doing!
One step closer! I hope this article helped show you how dynamic Ansible looping is done and you don’t have to fail and struggle with the concept like I did. I am out there on Twitter if you have any questions!